
This website contains affiliate links, and some products are gifted by the brand to test. As an Amazon Associate, I earn from qualified purchases. Some of the content on this website was researched and created with the assistance of AI technology.
Key Takeaways
- Green ribbon runner stripes create instant visual structure that transforms ordinary tables into intentionally designed Saint Patrick’s Day celebrations
- Ribbon width dramatically affects your tablescape’s personality, narrow ribbons feel delicate and formal while wider ribbons make bold, casual statements
- Diagonal stripe placement adds dynamic energy that straight horizontal or vertical lines cannot achieve
- Braided ribbon textures introduce dimensional interest that flat ribbons lack, creating displays that reward closer examination
- The runner stripe technique works across multiple surfaces, dining tables, kitchen islands, buffets, bar carts, and outdoor patios each benefit from adapted approaches
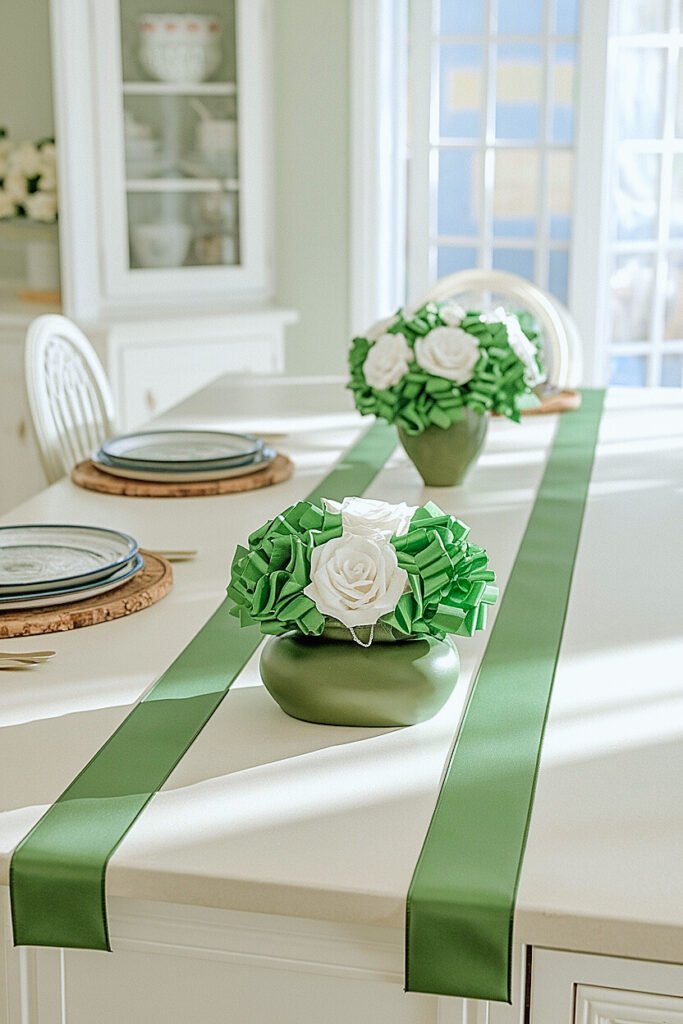
Using roses for Saint Patrick’s Day decorations with green ribbon runner stripes creates sophisticated tablescapes that feel both festive and intentionally designed. I stumbled onto this technique accidentally when a traditional table runner proved too short for my dining table, and I improvised with parallel ribbons instead. The result looked better than anything I’d achieved with conventional runners, more modern, more customizable, and infinitely more interesting.
The runner stripe approach offers flexibility that solid runners simply cannot match. You control the spacing, the width, the color variations, and the placement of roses in relation to your ribbon lines. Want stripes closer together? Adjust them. Prefer diagonal energy over horizontal calm? Simply change the angle. This adaptability makes ribbon stripes particularly valuable for Saint Patrick’s Day decorating, where green in various shades needs to work with rose arrangements of different sizes and colors across tables of varying dimensions.
Want your ribbon stripes and roses to look “designer” without guessing? Use this guide to pick stripe width, spacing, rose size, and the best surfaces—indoors and outdoors. It’s built for quick decisions, so your tables stay usable, your roses stay low, and your greens look deep and intentional.
Use this table to pick stripe width, stripe spacing, rose placement, and surface type. It’s tuned for hunter depth with pops of emerald and kelly.
| Surface + Setting | Ribbon Stripe Setup | Rose Placement Formula | Color + Finish Tips |
|---|---|---|---|
| Main dining table indoor party table |
2 medium stripes (parallel) Leave an open center lane for platters |
1 low bowl between stripes + 2 minis on stripes (even spacing) | hunter base + emerald greens Matte ceramics only |
| Kitchen island indoor snack zone |
2 slim stripes Stop stripes before the main prep zone |
1 compact crock on one stripe + 1 mini on the other | Add kelly napkins for pop Keep greens trimmed tight |
| Buffet table indoor serving line |
2 medium stripes Set back from front edge by 6–10″ |
2 end minis on stripes + 1 off-center crock between lanes | gold tray accents (small) No shiny pieces |
| Coffee table indoor living room |
2 slim stripes Keep stripes short so ends stay open |
1 low bowl + tiny minis only if space allows | deep red roses sparingly Keep height low |
| Covered patio table outdoor dining |
2 wide stripes Secure with hidden ties under the table |
Heavy low bowl + sturdy minis on stripes (wind-safe) | hunter + emerald greens Matte everything |
| Outdoor drink station outdoor cups + tub |
2 slim stripes Use stripes as “drink lanes” |
Roses on stripe edges only Keep center open for cups |
Use kelly accents sparingly Prioritize clear space |
| Picnic table outdoor daylight |
2 wide stripes Lightly secure so ribbon stays flat |
1 low sturdy bowl + 2 midsize minis (mid-table) | hunter ribbon + white roses Keep ends open for trays |
| Porch console outdoor welcome |
2 medium stripes Front-to-back for a clean lane look |
1 compact crock on one stripe + 1 tiny mini on the other | Add a small gold tray (matte) Leave space for function |
Main dining table (indoor party table)
Covered patio table (outdoor dining)
Outdoor drink station (cups + tub)
How to Style Saint Patrick’s Day Green Ribbon “Runner Stripes” With Roses on the Main Dining Table
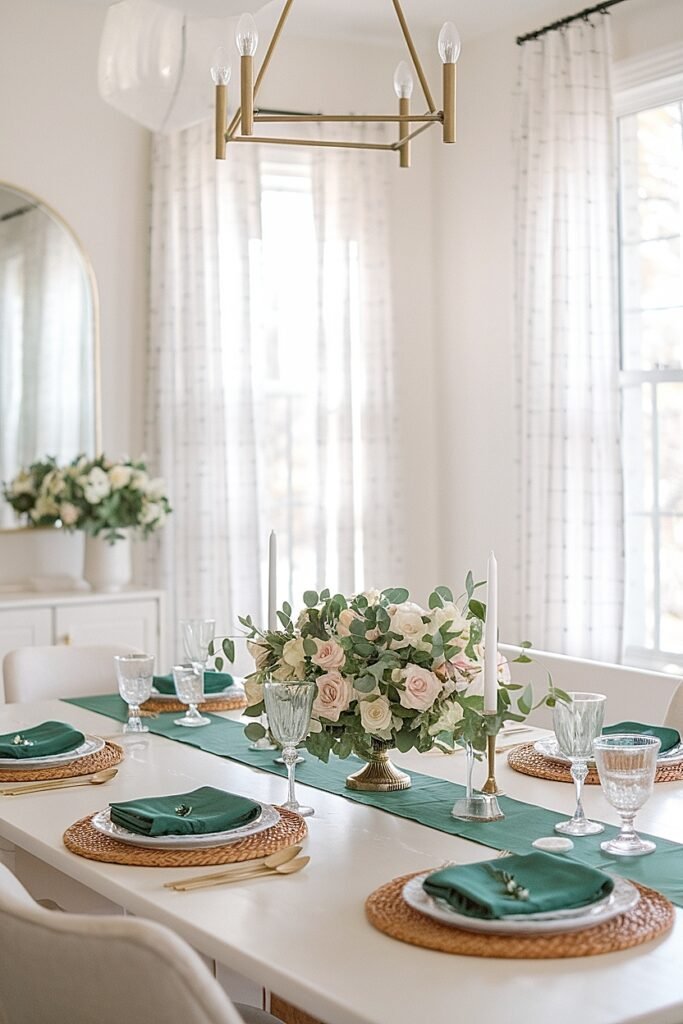
Your main dining table anchors the entire celebration, making it the natural starting point for mastering the runner stripe technique. The surface area of a dining table provides ample space for experimenting with stripe placement, width, and rose integration.
I always begin dining table decorating with this surface because successes here inform decisions throughout the rest of my home.
Start by measuring your table’s length and width, then decide how many stripes will create pleasing proportions. Odd numbers typically look better than even, three stripes on a narrow table, five on a wider one. Space your ribbons evenly, securing ends beneath the table edge with tape or small weights. The parallel lines create instant structure that transforms a plain tablecloth into something architectural and intentional.
Position your rose arrangements at intersections or along the stripes themselves. A central arrangement where stripes converge creates a natural focal point, while smaller arrangements distributed along stripe lines extend your floral presence across the full table length. The ribbons guide guests’ eyes in ways that centerpieces alone cannot achieve, creating visual pathways that connect different areas of your table design. For additional front entry decorating inspiration using roses, explore these Saint Patrick’s Day rose decoration ideas for front doors that complement your indoor tablescape. If this stripe technique resonates with your design aesthetic, share it with friends planning their own celebrations. But ribbon width significantly affects your final presentation, keep reading for specific width recommendations.
What Are the Best Saint Patrick’s Day Green Ribbon “Runner Stripes” Widths for Rose Tablescapes?
Ribbon width isn’t merely a practical consideration, it fundamentally shapes your tablescape’s personality and visual weight. The same green color reads entirely differently at one inch versus four inches wide, creating distinct moods that suit different entertaining scenarios.
I’ve experimented extensively with widths and found that matching stripe width to your occasion’s formality and your roses’ scale produces the most harmonious results.
1. Half-Inch Ribbon for Delicate Elegance Ultra-narrow ribbons create refined, almost ethereal stripes that suggest decoration without dominating. This width suits formal dinner parties where understated elegance matters more than festive boldness. Pair half-inch stripes with delicate spray roses or single-bloom bud vases that match the ribbon’s restraint. The narrow lines almost disappear from distance but reward closer examination with their precise, intentional presence. Use satin or silk ribbons at this width for maximum refinement.
2. One-Inch Ribbon for Versatile Balance One-inch width hits the sweet spot between visibility and restraint, making it the most versatile choice across entertaining scenarios. These stripes read clearly from across the room without overwhelming your roses or competing for attention. Most dining tables look balanced with one-inch stripes spaced three to four inches apart. This width accommodates both formal and casual settings, adapting to your other design choices rather than dictating the overall mood.
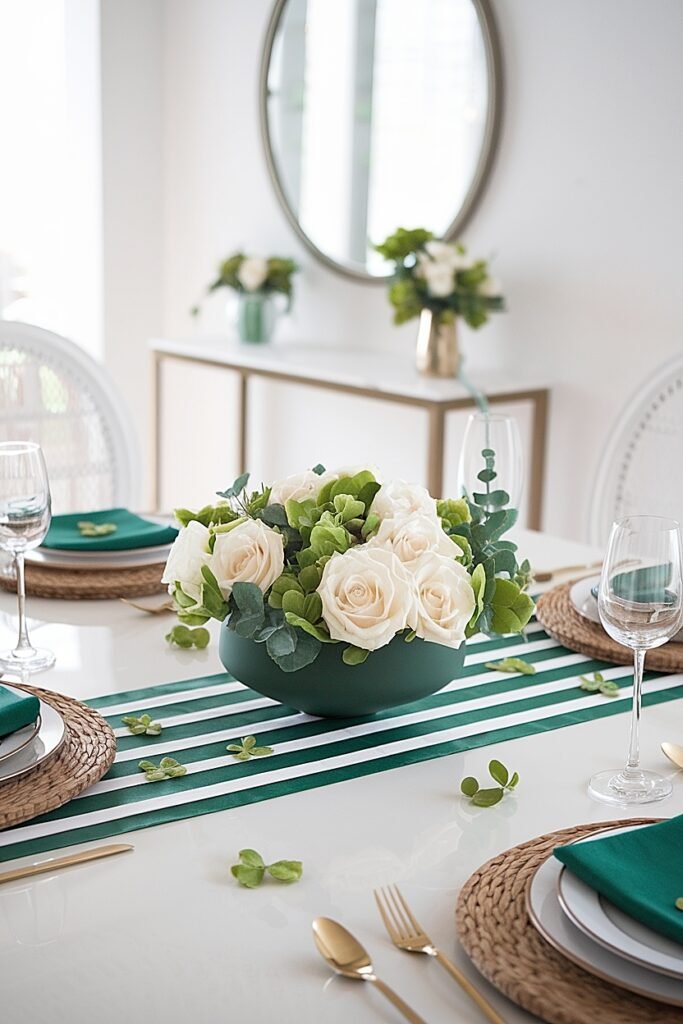
3. Two-Inch Ribbon for Confident Presence Two-inch stripes make bold statements that anchor your tablescape with confident green presence. This width suits casual celebrations where festive energy matters more than delicate refinement. Larger rose arrangements, full centerpieces rather than bud vases, pair proportionally with these substantial stripes. The wider ribbon also shows pattern and texture more effectively, making it ideal for ribbons with woven designs, printed motifs, or interesting surface treatments.
4. Three-Inch Ribbon for Modern Drama Three-inch stripes create dramatic visual impact that feels contemporary and design-forward. Use fewer stripes at this width, three maximum on most tables, to prevent overwhelming your surface. The substantial presence works particularly well with architectural rose arrangements in geometric containers or modern, minimalist vessels. This width suits hosts who want their decorating noticed and discussed rather than merely appreciated subtly.
5. Four-Inch Ribbon for Statement Tablescape Four-inch ribbons function almost as mini-runners themselves, creating bold bands of green that dominate your table design. Reserve this width for casual celebrations, large tables, or outdoor settings where subtlety would get lost. One or two four-inch stripes combined with abundant rose arrangements creates festival-level presence. This width demands quality ribbon, cheap material at this width looks obviously budget-conscious in ways narrower widths disguise.
Width affects visual weight, but diagonal placement adds dynamic energy, those techniques follow.
How to Create Saint Patrick’s Day Diagonal Green Ribbon “Runner Stripes” With Roses
Diagonal stripes introduce movement and energy that horizontal or vertical lines cannot achieve. The angled placement creates visual dynamism that makes tables feel active and exciting rather than static and predictable.
I discovered diagonal stripes while trying to disguise an oddly shaped table, and now I prefer them for celebrations where I want energetic atmosphere.
Creating diagonal stripes requires slightly more planning than straight placement. Measure your table’s corners and determine your desired angle, forty-five degrees creates classic diagonal energy, while steeper or shallower angles produce different effects. Mark your line positions lightly with painter’s tape or fabric chalk before committing to ribbon placement. The extra planning prevents frustrating adjustments once you’ve begun laying stripes.
Secure ribbon ends at table corners or edges where the diagonal intersects, using tape, small clamps, or decorative weights that become part of your design. Position roses along the diagonal lines, allowing the angled stripes to guide eye movement across your table in dynamic sweeps. The diagonal creates natural grouping opportunities, arrangements clustered where multiple diagonals would intersect (even if you’re only using parallel diagonals) create focal points that feel inevitable rather than arbitrary. Kitchen islands present different stripe opportunities, continue reading for those specific approaches.
Ideas for Saint Patrick’s Day Green Ribbon “Runner Stripes” With Roses on a Kitchen Island
Kitchen islands serve multiple functions during celebrations, prep surfaces, buffet stations, casual gathering spots. Ribbon stripes here must enhance without obstructing the island’s practical purposes, requiring adapted approaches from dining table techniques.
I approach island decorating with functionality as a primary constraint, beauty that interferes with cooking or serving fails regardless of how gorgeous it appears.
1. Single Central Stripe with Rose Stations Run one wide green ribbon down your island’s center, placing rose arrangements at each end. The single stripe creates order without consuming excessive surface area needed for food prep or serving. This minimalist approach suits islands where function must coexist with decoration throughout your celebration.
2. Perpendicular Stripe Pattern Create a grid pattern with stripes running both directions, then place roses at intersection points. The geometric structure organizes your island surface into distinct zones, decorative intersections and functional open spaces. Guests intuitively understand which areas are for decoration and which remain available for plates and glasses.
3. Edge-Only Stripe Framing Position stripes along your island’s outer edges only, framing the work surface without crossing it. Small rose arrangements anchor each corner where stripes meet. This perimeter approach keeps the entire central area clear while establishing a festive border that defines the space.
4. Cascading Corner Treatment Concentrate stripes and roses at one island corner, leaving the majority of surface clear. The clustered approach creates one impactful decorative moment without distributed obstruction. This works particularly well for islands that will see heavy food service throughout your party.
5. Waterfall Edge Extension Allow ribbon stripes to drape over one island edge, creating a “waterfall” effect with roses tucked into the cascading ribbons. The vertical extension adds dimension while keeping the actual island surface mostly clear. The dramatic effect suits islands with finished edges meant for visual appreciation.
Islands demand practical approaches, but buffet tables offer different stripe opportunities, those techniques follow.
Ways to Use Saint Patrick’s Day Green Ribbon “Runner Stripes” With Roses on a Buffet Table
Buffet tables prioritize food service above all else, yet they still benefit from thoughtful decoration that enhances the dining experience. Ribbon stripes here must guide guests through the serving flow while adding festive presence that doesn’t obstruct reaching for dishes.
I treat buffet decorating as functional design, every element should serve the eating experience rather than merely existing nearby.
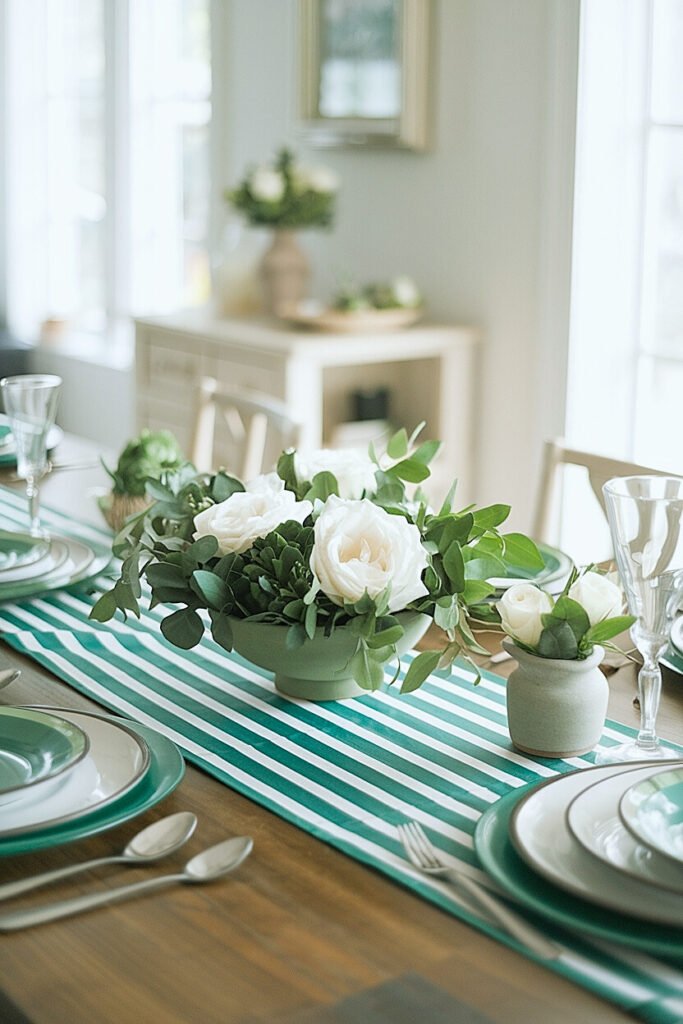
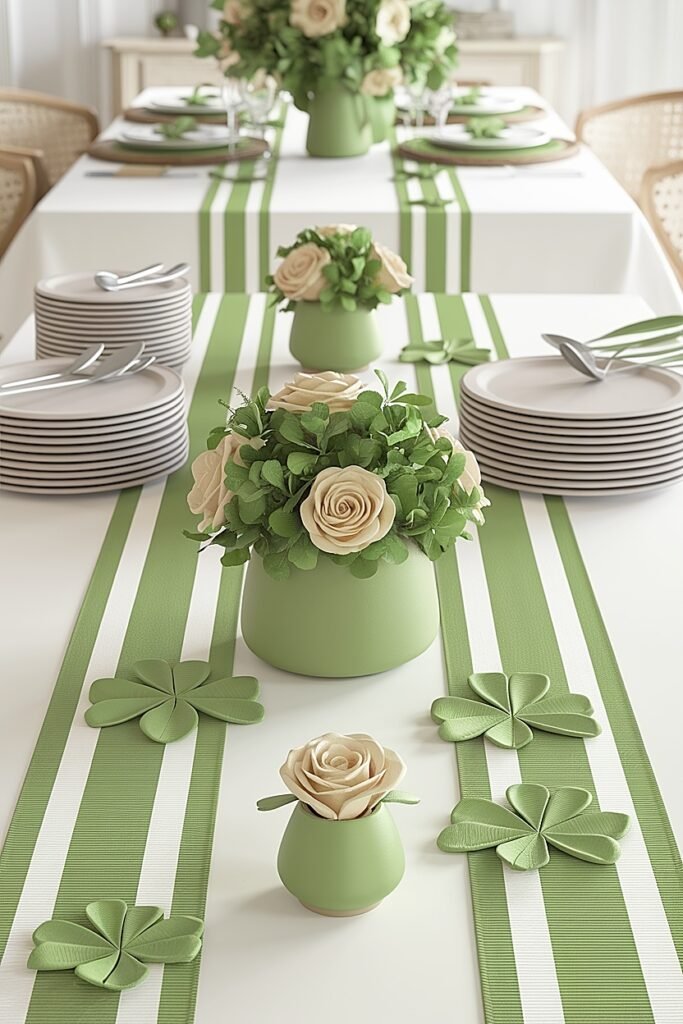
1. Parallel Stripes Guiding Service Flow Run ribbon stripes parallel to the buffet’s length, creating visual lanes that guide guests along the serving path. Position roses between stripes where they won’t interfere with reaching across for food. The parallel lines create order that helps guests navigate the spread intuitively, moving from start to finish without confusion about intended flow.
2. Perpendicular Divider Stripes Position stripes perpendicular to the buffet length, creating visual divisions between different food categories, appetizers, mains, desserts. Small rose arrangements mark each section’s beginning. The stripe dividers organize your spread into logical groupings that help guests understand and navigate your offerings without crowding at one spot.
3. Backdrop Stripe Integration If your buffet sits against a wall, extend ribbon stripes upward onto the wall surface behind the table. The vertical extension creates a backdrop that frames your spread while keeping the actual table surface clear for serving pieces. Roses can climb the wall-mounted stripes or remain on the table below.
4. Corner Concentration Strategy Cluster ribbon stripes and roses at the buffet’s back corners, leaving the entire front and center clear for food access. The corner concentration creates festive presence visible from across the room while maintaining complete functionality for actual serving purposes. Guests appreciate unobstructed access to your carefully prepared dishes.
5. Under-Chafing Dish Accent Run ribbon stripes beneath raised chafing dishes and serving platforms, allowing the green to show between and around elevated pieces. The stripes peek through serving arrangements rather than competing for surface space. Roses positioned beside chafing dishes connect the visible stripe glimpses into cohesive design.
Buffets demand food-service priority, but braided ribbon textures add dimensional interest, those techniques follow.
How to Do Saint Patrick’s Day Green Ribbon “Runner Stripes” With Roses Using Braided Ribbon Texture
Braided ribbons introduce three-dimensional texture that flat ribbons simply cannot achieve. The woven structure creates shadows, highlights, and visual complexity that rewards closer examination and photographs beautifully.
I started using braided textures after noticing how flat ribbons looked disappointingly plain in photos despite looking fine in person.
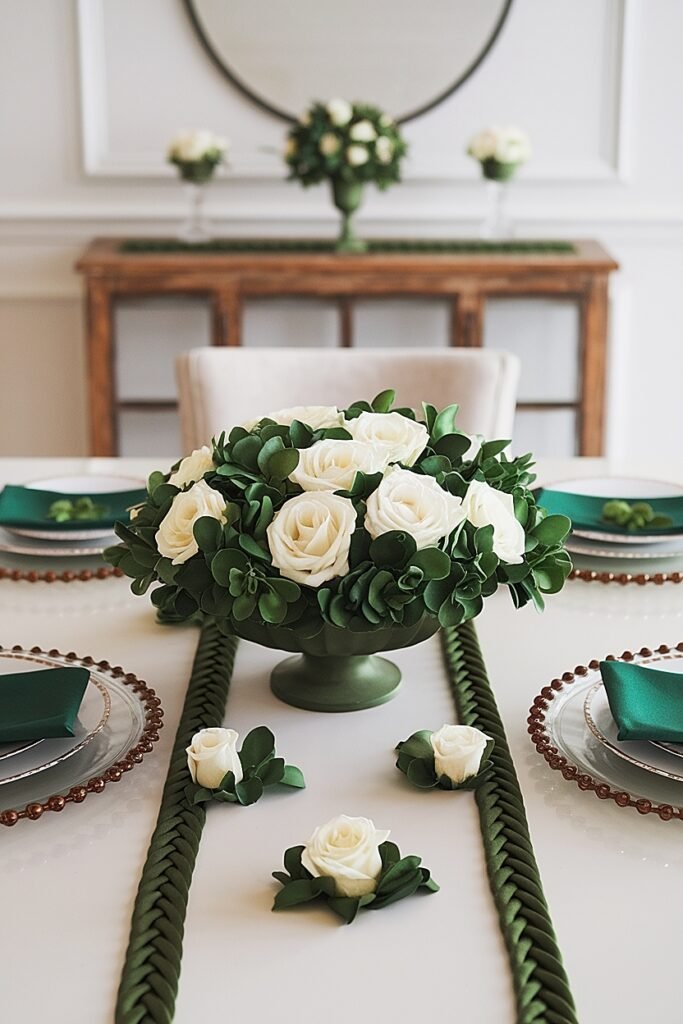
Creating braided ribbon stripes requires either purchasing pre-braided ribbon or weaving your own from narrower ribbons. For DIY braiding, select three ribbons in complementary green shades, perhaps sage, emerald, and hunter, and braid them together before laying as stripes. The color variation within each stripe adds richness that single-color flat ribbons lack.
Position braided stripes where guests will see them closely, down the table center rather than at edges, or at individual place settings where the texture invites touch. Roses complement braided texture particularly well because both elements offer organic complexity. The roses’ petal layers echo the ribbon’s woven structure, creating visual harmony between floral and fabric elements. The textural conversation between braided ribbon and rose petals elevates your entire tablescape beyond what either element achieves alone. Entry consoles offer different stripe opportunities, continue reading for those specific approaches.
Ideas for Saint Patrick’s Day Green Ribbon “Runner Stripes” With Roses on an Entry Console
Entry consoles create first impressions as guests transition from arrival into celebration. Ribbon stripes here establish your Saint Patrick’s aesthetic immediately, setting expectations for the designed environment awaiting throughout your home.
I treat console decorating as visual foreshadowing, hints of the beauty guests will discover as they move deeper into my celebration.
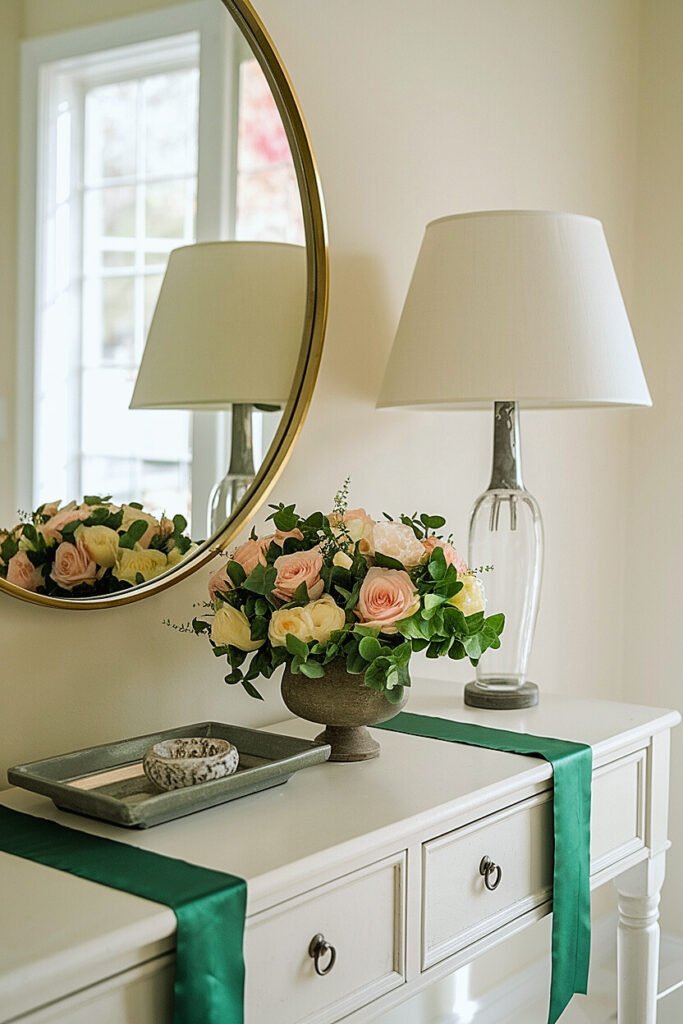
1. Vertical Drape with Horizontal Stripe Intersection Allow ribbons to drape over the console’s front edge vertically while a single horizontal stripe runs across the top. Roses cluster where vertical meets horizontal. This perpendicular intersection creates a focal point that draws eyes immediately upon entry. The vertical drape adds dimension that purely horizontal surface stripes cannot achieve.
2. Mirror Integration Design If a mirror hangs above your console, extend ribbon stripes from the table surface upward onto the mirror frame or across the mirror surface itself. The reflection doubles your ribbon presence while roses on the console below anchor the design in three-dimensional space. The mirror integration makes modest stripe arrangements appear more substantial.
3. Cascading Asymmetrical Arrangement Position stripes asymmetrically, clustered toward one console end, with roses concentrated in the stripe-heavy zone. The asymmetry creates visual interest that perfectly centered arrangements lack while the concentration builds impact through density rather than distribution. Leave the opposite console end clear for keys, bags, or arriving guests’ items.
4. Multi-Level Stripe Extension If your console has shelves or lower tiers, extend stripe patterns across multiple levels. Roses on each tier connected by continuous stripes create unified design that uses the console’s full dimensional potential. The multi-level approach suits substantial entry furniture with storage components.
5. Ribbon Frame Around Rose Focus Create a rectangular ribbon frame on your console surface, positioning your rose arrangement within the framed space. The ribbon boundary defines and emphasizes your flowers while the geometric structure adds architectural interest. This framing technique makes even modest rose arrangements appear intentional and significant.
Consoles set first impressions, but bar carts present different stripe opportunities, those techniques follow.
Ways to Use Saint Patrick’s Day Green Ribbon “Runner Stripes” With Roses on a Bar Cart
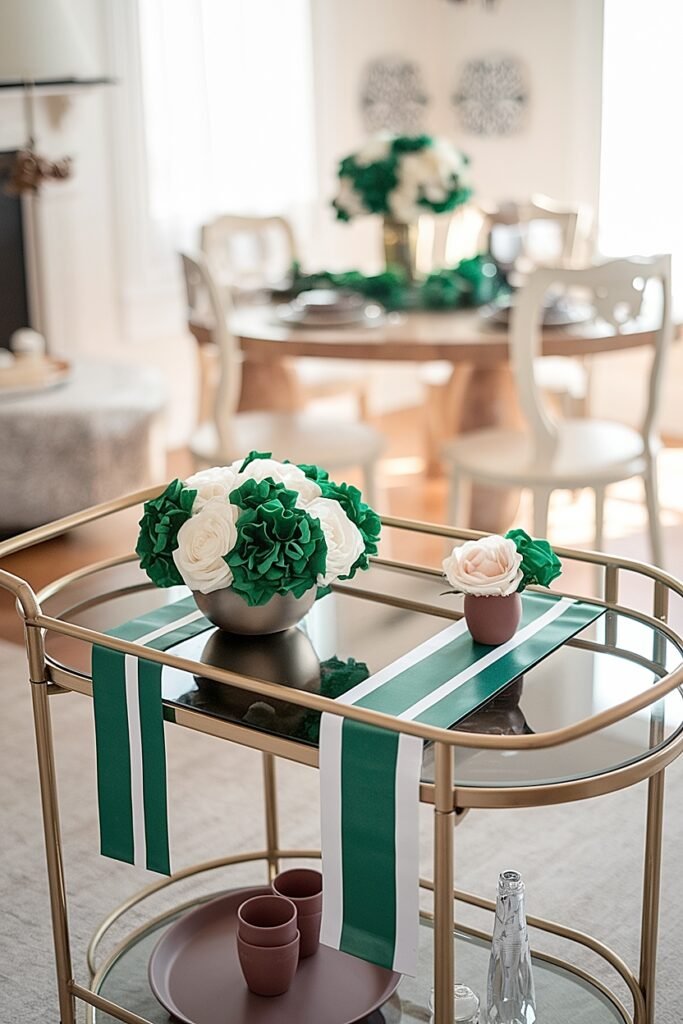
Bar carts serve celebratory beverages while showcasing your Saint Patrick’s aesthetic in compact, portable form. Ribbon stripes on these small surfaces must enhance without obstructing bottle access or glass service.
I approach bar cart decorating as miniature design, every element earns its spot through both beauty and practical value.
1. Tier-Connecting Vertical Stripes Run narrow ribbon stripes vertically from top tier down the cart frame to bottom tier, connecting the levels visually. Small rose arrangements on each tier appear linked by the continuous stripe pattern. The vertical connection unifies what might otherwise feel like separate decorating zones on the cart’s multiple surfaces.
2. Bottle Backdrop Stripe Panel Create a small striped panel that stands behind your bottles, providing a festive backdrop without consuming any cart surface. The panel can lean against the cart’s back rail or attach to the frame. Roses at panel base blend the backdrop into the cart’s content, softening the transition between vertical backdrop and horizontal surfaces.
3. Handle Wrap Integration Wrap ribbon around the cart’s push handle, continuing the stripe pattern from the cart surface up the frame to the handle. The wrapped handle becomes part of your design rather than merely functional hardware. A tiny rose arrangement near the handle base where wrapping begins grounds the extended design.
4. Tray Liner Stripe Pattern Line your cart’s tray surfaces with striped ribbon arrangements before positioning bottles and glasses. The stripe liner shows between and around your barware, adding color to spaces that would otherwise appear as plain tray surface. Roses at tray edges frame the beverage display.
5. Cascading Front Drape Allow ribbon stripes to cascade over the cart’s front edge, creating movement that catches eyes from across the room. Weight ribbon ends with small decorative objects or tuck them beneath the cart’s lower tier. Roses on the top surface connect to the cascading stripes below, creating visual flow from arrangement to drape.
Bar carts serve drinks stylishly, but covered patio dining tables present outdoor challenges, those final techniques follow.
How to Use Saint Patrick’s Day Green Ribbon “Runner Stripes” With Roses on a Covered Patio Dining Table
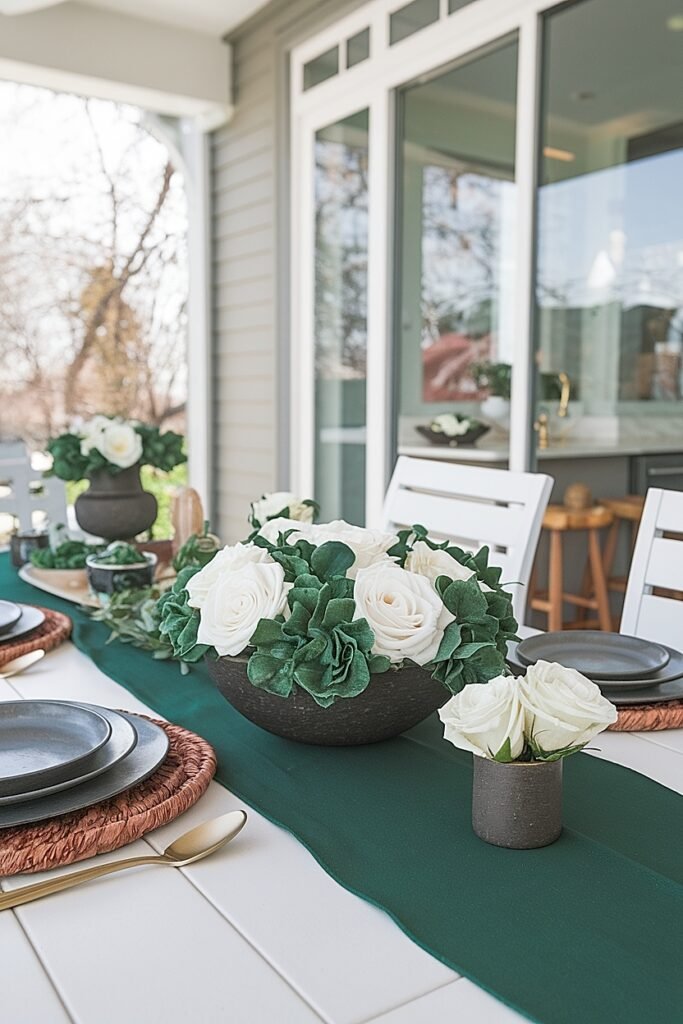
Covered patio tables occupy the sweet spot between protected interiors and exposed outdoor conditions. The roof overhead shields ribbon stripes and roses from direct weather while fresh air circulation and natural light create distinctly outdoor atmosphere.
I find patio stripe decorating particularly rewarding because natural light reveals ribbon colors and rose beauty in ways artificial illumination cannot match.
Outdoor conditions require heavier ribbon materials that resist lifting in breezes. Grosgrain, canvas, or woven ribbons perform better than lightweight satin or silk that flutter at every air movement. Secure stripe ends firmly, outdoor tape, decorative weights, or clips hidden beneath table edges prevent wind from disrupting your careful arrangements.
For roses, select hardy varieties that tolerate temperature fluctuations and air movement. Position arrangements in weighted containers that won’t tip during gusts. The covered patio protection allows more delicate designs than fully exposed positions would permit, but some weather consideration remains necessary. Use the natural light to your advantage, morning or late afternoon illumination makes green ribbons glow beautifully, while harsh midday sun can wash out colors. Time your celebration to coincide with flattering light for maximum visual impact. The combination of ribbon stripes with roses under covered outdoor conditions creates memorable tablescapes that indoor settings simply cannot replicate.
Conclusion
Ribbon runner stripes offer creative flexibility that traditional table runners cannot match. You control every variable, width, spacing, angle, texture, creating custom designs that suit your specific tables, roses, and Saint Patrick’s Day vision. The technique works across surfaces throughout your home, from dining tables to bar carts, each location benefiting from adapted approaches that respect its particular function.
Start simple with straight parallel stripes on your main dining table, then experiment with diagonal placement, braided textures, and multi-surface extensions as your confidence grows. The learning curve is gentle, the materials are affordable, and the results consistently impress guests who’ve never encountered this approach to holiday decorating. Green ribbon stripes with roses transform ordinary surfaces into intentionally designed celebrations worthy of the occasion.
This website contains affiliate links, and some products are gifted by the brand to test. As an Amazon Associate, I earn from qualified purchases. Some of the content on this website was researched and created with the assistance of AI technology.