This website contains affiliate links, and some products are gifted by the brand to test. As an Amazon Associate, I earn from qualified purchases. Some of the content on this website was researched and created with the assistance of AI technology.
Key Takeaways
- Buffet centerpieces must occupy minimal surface area, maximum 12 inches width for standard 30-inch buffet tables
- Back-of-table positioning creates floral presence while preserving entire front area for serving dishes
- Low troughs (under 5 inches tall) provide visual interest without obstructing food sightlines
- Two small centerpieces positioned at buffet ends work better than one central piece blocking serving flow
- Bar cart arrangements need one-tier-only floral placement to preserve other tiers for functional use
- Runner arrangements require strategic gaps every 18-24 inches for setting down serving utensils and dishes
Creating spring tulip patio centerpieces for buffets requires completely abandoning traditional centerpiece thinking where flowers compete with food for attention and space. I learned this the hard way hosting my first outdoor buffet three years ago, I positioned what I thought was a modest tulip arrangement at my buffet’s center, and within fifteen minutes guests had relocated it to a side table so they could actually access the potato salad and grilled chicken. Humbling doesn’t begin to describe watching people move your “beautiful” centerpiece like it’s an obstacle rather than an enhancement.
Buffets operate under fundamentally different rules than seated dining tables. People approach from one side only, serving utensils extend outward from dishes creating invisible buffer zones, and the constant traffic of guests moving along the buffet line means anything in the way gets bumped, shifted, or relocated. Your centerpiece can’t just look pretty, it must function within this high-traffic, food-focused context or it fails completely regardless of aesthetic merit. The successful buffet centerpiece enhances the food presentation without ever interfering with serving logistics, creating beauty through strategic placement rather than demanding attention through size or central positioning.
This quick table makes tulip styling feel easy. Pick your surface, choose a low container that won’t block anything, follow a simple “food-first” layout, and grab a copy-and-paste checklist. It’s built for real homes—busy counters, porches, patios, buffets, and small spaces.
Spring Tulips Setup Guide (Food-First + Photo-Friendly)
Pick your surface, keep tulips low, protect the “grab lane,” and use mini repeats nearby for a fuller look.
| Surface + Use Case | Best Low Container | Food-First Layout Rules | Copy Checklist |
|---|---|---|---|
|
OutdoorPatio Buffet Console
Best for: serving boards + plates
|
Shallow trough Tight “pocket clusters” (3 sections) for fullness. Avoid: tall vases, wide sprawl
|
Back-edge only: flowers live behind food. Clear front lane: plates + utensils stay reachable. Reach test: can you grab a plate without touching tulips? |
Instant paste |
|
OutdoorBar Cart Snack Station
Best for: cups + quick grabs
|
Low bowl or mini trough Compact dome cluster, short and dense. Tip: weight the container
|
Back corner rule: flowers in one corner only. Grab zone: front space stays empty for hands. Repeat color: add a tiny mini nearby, not on cart. |
Instant paste |
|
IndoorKitchen Island Hosting
Best for: family-style snacks
|
Low oval bowl Dense pockets, short stems, tidy dome. Keep it “low + wide”
|
Corner placement: back corner only. Open center: snacks + boards stay in main zone. Sightline rule: keep tulips below eye path across kitchen. |
Instant paste |
|
IndoorCoffee Station Counter
Best for: mugs + supplies
|
Mini low pot One tight cluster (small footprint). Keep space for tools
|
Back-corner only: protect the working lane. No lean rule: tight pockets so tulips don’t drift. One color repeat: add a tiny mini on a shelf. |
Instant paste |
|
OutdoorPorch Welcome Table
Best for: quick pop at entry
|
Low crock or short basket liner Wide base, short tulips, dense fill. Stable = safer on breezy porches
|
Edge buffer: keep tulips back from the front edge. Walkway clear: no pieces spilling into traffic. Repeat mini: add one on bench/step (off walkway). |
Instant paste |
|
IndoorEntry Console Grab Zone
Best for: napkins + small plates
|
Shallow tray planter Low, compact, tidy clusters. Avoid tall, thin containers
|
Two-zone rule: flowers back, grab items front. Traffic-safe: keep height low for busy entryways. Repeat color: tiny mini in hallway for cohesion. |
Instant paste |
Patio Buffet Console
Outdoor • Back-edge only • Clear front lane
Tap ▾
Bar Cart Snack Station
Outdoor • Back corner rule • Grab zone stays open
Tap ▾
Kitchen Island Hosting
Indoor • Back corner • Open center for snacks
Tap ▾
Coffee Station Counter
Indoor • Back-corner only • Protect workspace
Tap ▾
Porch Welcome Table
Outdoor • Edge buffer • Walkway stays clear
Tap ▾
Entry Console Grab Zone
Indoor • Two-zone rule • Traffic-safe height
Tap ▾
How to Set Spring Tulips Patio Centerpieces for Buffets That Keep Food First
The food-first mindset means planning your buffet layout with serving dishes positioned first, centerpiece placed last in whatever space remains. This backwards approach feels counterintuitive, we’re trained to place centerpieces first, then arrange everything else around them, but it’s the only method producing functional results on buffets where food is the actual star.
I now mock up my entire buffet before adding any flowers. Literally. I set out every serving dish, every platter, every bowl that will hold food, spacing them with proper clearance for serving utensils. Only after this complete layout do I identify remaining gaps where tulip arrangements might fit without interfering with serving logistics. This process reveals the truth most people ignore: buffets rarely have room for traditional centerpieces.
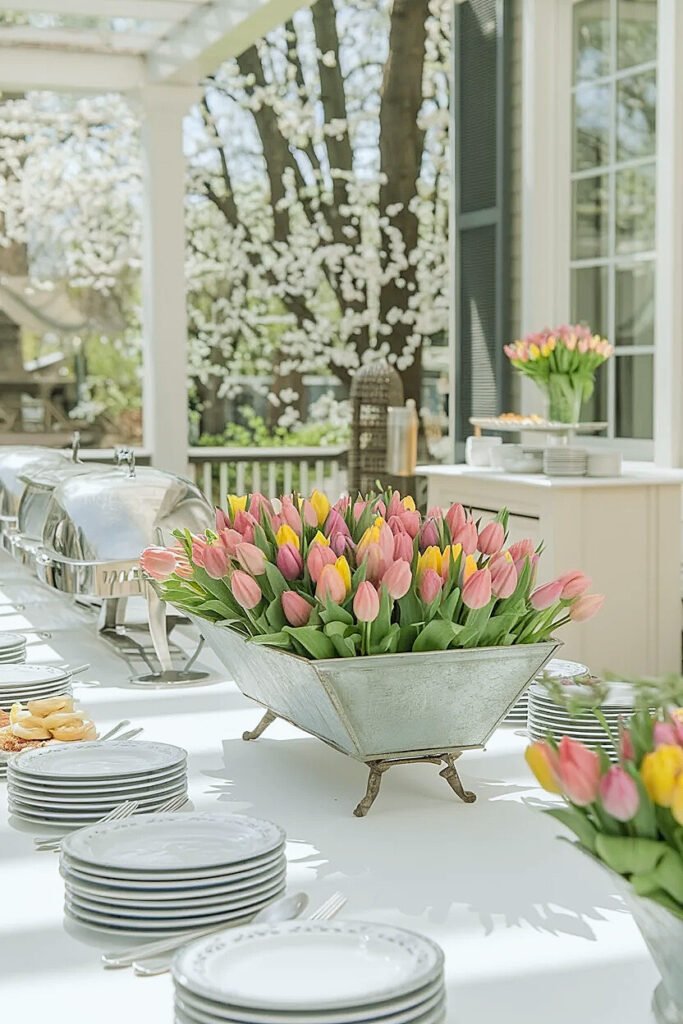
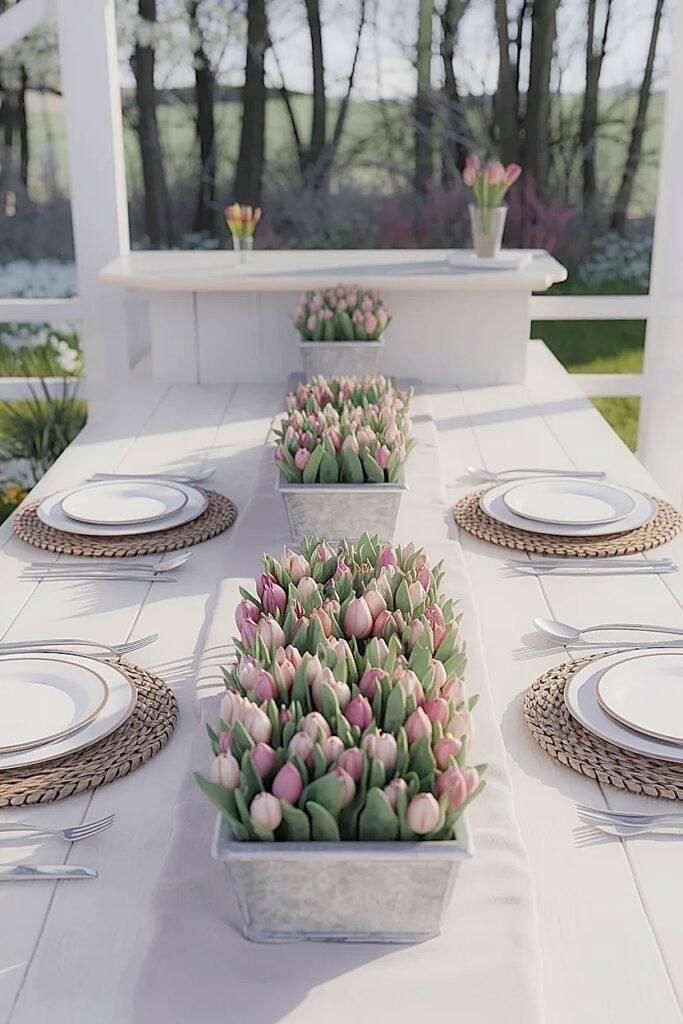
The space that typically remains sits either at the buffet’s absolute ends (bookend positions) or along the back edge against any wall or backdrop. These locations allow floral presence without claiming the precious front-center real estate where serving dishes must live and guests’ hands must move freely. I’ve measured this obsessively and found that on standard 30-inch-deep buffet tables, anything positioned more than 8 inches from the front edge becomes invisible behind serving dishes anyway, so why fight for center space when back-edge placement works better functionally and visually?
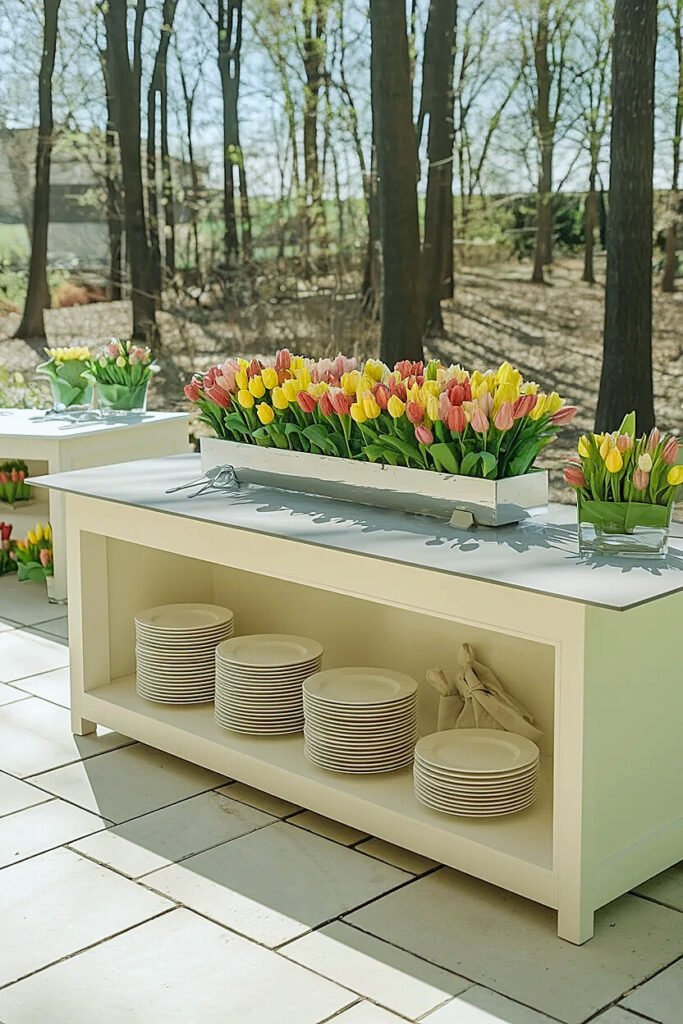
The container selection becomes critical for food-first buffets. I use only low troughs or narrow rectangular vessels, nothing circular or square that claims unnecessary width. A 20×6 inch trough creates substantial visual presence through length while the 6-inch width occupies minimal buffet depth. Circular bowls measuring 12 inches diameter claim that same space in all directions, wasting precious front-to-back depth on a surface where depth is your scarcest resource, and when you’re ready to explore how different container shapes work in various buffet contexts, there’s detailed guidance on matching vessel geometry to your specific setup, definitely share this with anyone planning outdoor entertaining!
The food-first principles establish your entire approach, and the trough selection guidance ahead shows which specific vessels excel in these demanding contexts.
What Are the Best Low Troughs for Spring Tulips Patio Centerpieces for Buffets
Troughs excel on buffets through space efficiency, their linear forms create substantial visual presence while occupying minimal width that would otherwise compete with serving dishes. The low profile prevents visual barriers between guests and food, maintaining clear sightlines that help people identify dishes quickly rather than guessing what’s in containers obscured by tall centerpieces.
I’ve tested probably twenty different trough styles over multiple buffet setups, and certain characteristics consistently separate winners from failures: narrow width (6 inches maximum), substantial length (18+ inches creating meaningful presence), low height (under 5 inches preventing sightline obstruction), and material weight (5+ pounds resisting the inevitable bumps from serving traffic).
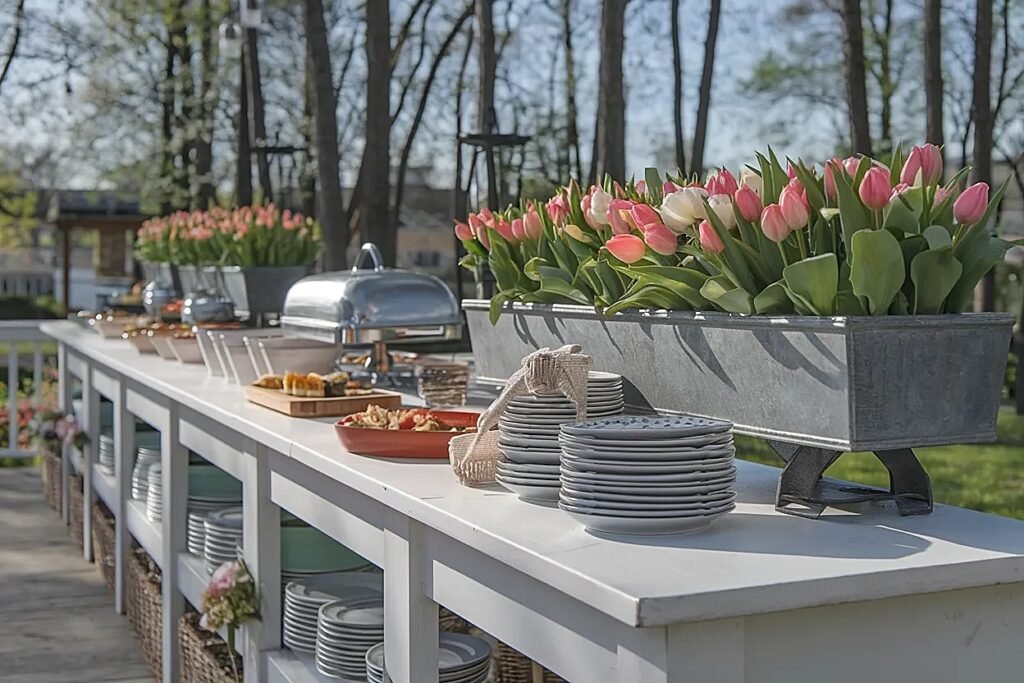
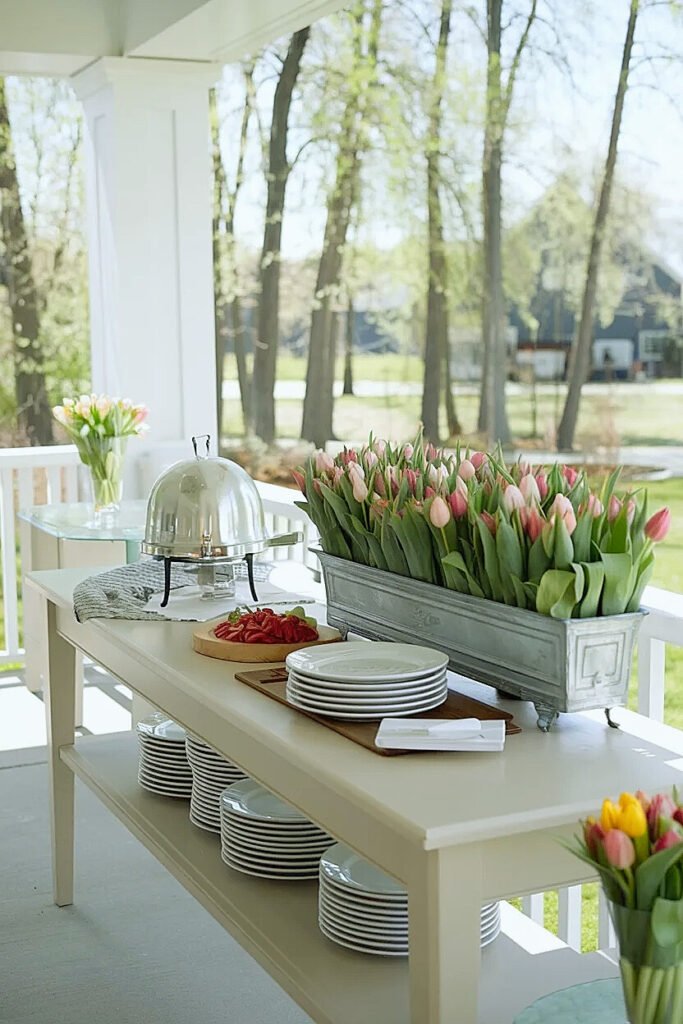
1. Galvanized Metal Farmhouse Trough (20×6 inches, 4-inch height)
The industrial metal creates rustic charm while the narrow 6-inch width preserves maximum buffet depth for serving dishes. The 20-inch length provides substantial presence along buffet edges or back areas. The metal durability handles outdoor conditions and inevitable bumps from serving utensils without damage. Weight typically runs 4-5 pounds providing adequate stability. Line with plastic before adding water preventing eventual metal corrosion from constant moisture exposure.
2. Concrete Modern Rectangular Trough (18×5 inches, 3-inch height)
Contemporary concrete creates minimalist aesthetic with exceptional weight, typically 8-10 pounds, resisting even aggressive bumps from busy buffet traffic. The ultra-low 3-inch height maintains perfect sightlines across buffet surfaces. The gray neutral complements any tulip color without competing visually. The 18-inch length works on shorter buffets where 20+ inch vessels would overwhelm. The substantial construction handles outdoor temperature fluctuations without cracking unlike thinner ceramic alternatives.
3. Rustic Wood Dough Bowl (22×7 inches, 4-inch height)
Extended 22-inch length creates dramatic presence perfect for longer buffets 6+ feet. The wood brings authentic farmhouse aesthetic appropriate for casual outdoor entertaining. The narrow-ish 7-inch width still preserves substantial buffet depth. Always line with heavy plastic before use since wood rarely provides waterproof surfaces. The natural material feels garden-appropriate rather than trying to import indoor formality into outdoor buffet contexts where it doesn’t belong.
4. White Ceramic Rectangular Baker (16×8 inches, 3-inch height)
Clean white creates elegant neutral backdrop while the ceramic weight provides good stability. The moderate 16-inch length suits medium buffets 4-5 feet long. The 8-inch width represents maximum acceptable for standard 30-inch-deep buffets, any wider starts competing problematically with serving dish space. The shallow 3-inch depth forces appropriate low-profile arrangements. The ceramic handles outdoor conditions well and cleans easily after events.
5. Elongated Terra Cotta Planter (18×6 inches, 4-inch height)
Earthy terracotta creates Mediterranean warmth with the porous material providing good drainage if using planted bulbs rather than cut stems. The 18×6 dimension hits ideal proportions for most buffet applications. The material weight runs 3-4 pounds, adequate for protected patios but potentially light for windy exposures. The natural clay color flatters any tulip shade. Requires plastic liner for cut flower arrangements to prevent water seepage through porous walls.
These trough options establish your vessel vocabulary, and the survival strategies ahead address how to build arrangements withstanding the chaos of active buffet service.
How to Build Spring Tulips Buffet Centerpieces That Survive Busy Serving Traffic
Buffet centerpieces face physical challenges that seated table arrangements never encounter, they get bumped by reaching arms, jostled by shifting serving dishes, and occasionally knocked by guests navigating crowded buffet lines while juggling plates and drinks. Building for survival means engineering stability into every aspect rather than hoping people will be careful around your flowers.
The foundation: weighted vessels positioned strategically away from highest-traffic zones. I use only containers weighing 5+ pounds empty, ensuring they won’t shift from minor bumps. Anything lighter gets relegated to side table use where traffic doesn’t threaten stability. The positioning matters equally, centerpieces belong at buffet ends or back edges where they’re visible but unlikely to get struck by normal serving motions.
Floral foam becomes essential for buffet arrangements where you can’t rely on people being gentle. I secure foam to vessel bottoms using waterproof floral tape, preventing the foam block from shifting if the container gets bumped. Then I insert stems firmly into the foam, no loose arrangements where stems might dislodge from impacts. This creates essentially permanent installation for the event’s duration rather than delicate composition that falls apart from minor disturbance.
The stem count affects stability too. Dense arrangements with stems packed tightly support each other structurally, creating mass that resists shifting better than sparse arrangements where individual stems can move independently. I use minimum 12-15 stems per trough arrangement, creating sufficient density that the collective mass stays stable even if individual stems get jostled. This is one case where more actually creates better results, the abundance provides structural stability beyond its aesthetic contribution.
Testing matters enormously. Before guests arrive, I deliberately bump the buffet table, simulating the inevitable impacts that serving traffic creates. If anything shifts, I reinforce it immediately, adding more foam tape, repositioning the vessel further from the edge, or reducing height if top-heaviness seems problematic. This preemptive testing prevents mid-event disasters where your centerpiece tips during actual service.
The survival engineering ensures your arrangements last through actual use, and the back-placement ideas ahead show how to create presence without claiming prime buffet real estate.
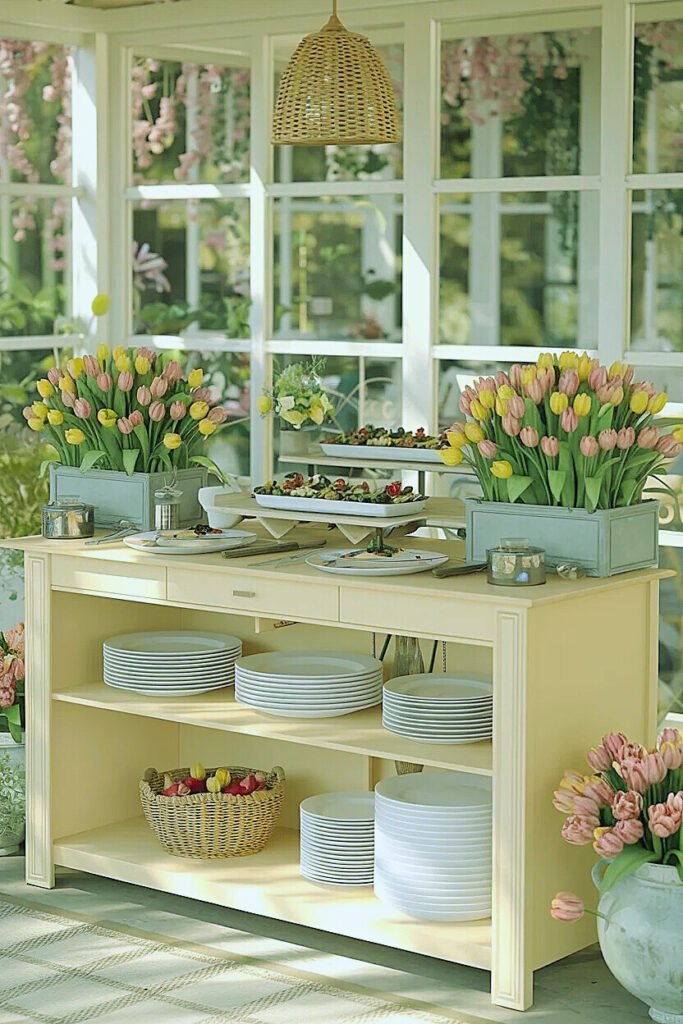
Ideas for Spring Tulips Patio Centerpieces for Buffets Using Back-of-Table Placement
Back-of-table positioning solves buffets’ fundamental space problem by creating floral presence while preserving the entire front area for food and serving access. This placement works when your buffet sits against a wall, fence, or house exterior providing backdrop that arrangements can nestle against.
The back position transforms your centerpiece from potential obstacle into intentional backdrop, creating layered depth where flowers frame food rather than competing with it.
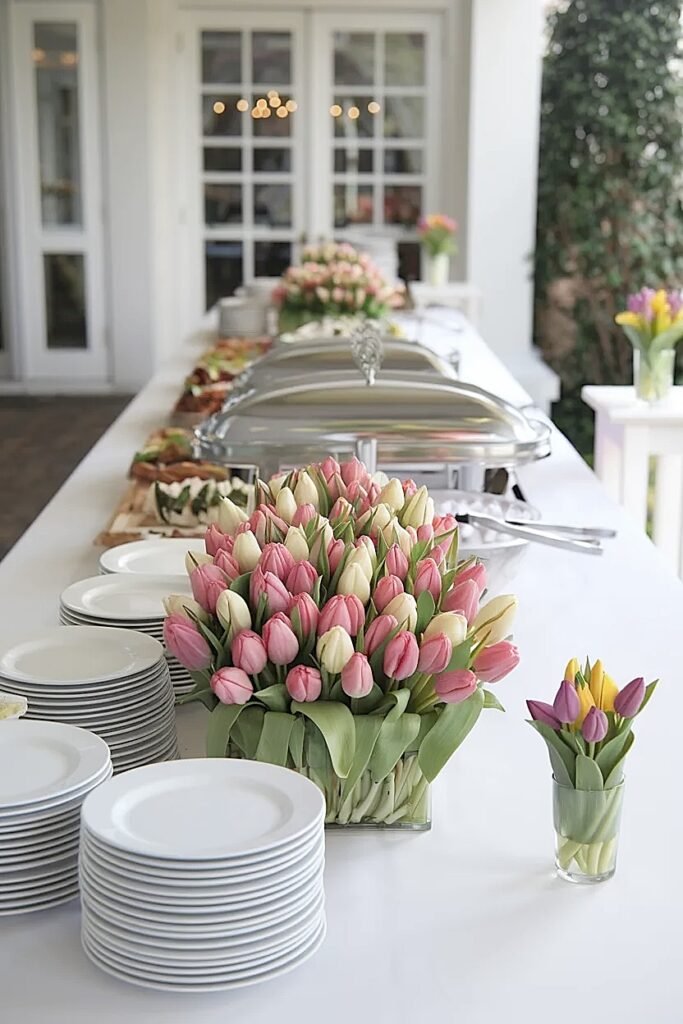
1. Continuous Trough Along Full Back Edge
Position one long trough (30+ inches) or multiple troughs end-to-end running the buffet’s entire back edge, creating continuous floral presence framing the food display. Use 20-25 tulip stems creating abundant backdrop. The back positioning means arrangement gets viewed frontally, so build density toward front. This creates professional catering-style presentation where flowers enhance food showcase.
2. Elevated Platform Behind Serving Height
Mount arrangement on 6-8 inch riser positioned at buffet’s back, elevating flowers above serving dish height creating visible presence without claiming surface space. Use 12×6 inch trough with 10-12 stems. The elevation ensures flowers remain visible behind taller serving dishes. The riser can be overturned crate, stacked books, or purpose-built platform.
3. Wall-Mounted Installation Above Buffet
Hang shallow trough or window box directly on wall behind buffet, creating floral backdrop without any table surface occupation. Use 18-inch trough with 10-15 stems arranged to cascade slightly forward. This completely liberates table surface while creating dramatic vertical backdrop. Requires wall access and secure mounting but delivers maximum impact with zero buffet footprint.
4. Staggered Height Back Row
Position three vessels of varying heights (3-inch, 5-inch, 7-inch) along buffet’s back edge creating tiered visual interest. Each holds 5-7 stems. The varied heights create dimensional backdrop preventing flat uniformity. Space vessels evenly across buffet length. The back-row positioning keeps everything behind serving dish zone.
5. Corner Concentration with Diagonal Orientation
Place substantial arrangement in one back corner angled diagonally toward buffet center, creating dynamic backdrop without claiming center space. Use 14×8 inch trough with 12-15 stems. The diagonal orientation adds visual interest beyond parallel positioning. The corner location anchors composition while leaving maximum central area clear for food.
The back-placement strategies create presence through position rather than size, and the dual mini-centerpiece concepts ahead show how multiplication through smaller vessels often works better than single large pieces.
Ways to Use Two Mini Spring Tulips Patio Centerpieces on Buffets Instead of One Big One
Two small centerpieces positioned strategically at buffet ends create bookend framing effect while leaving the entire central span free for food service, a solution far superior to one central piece that blocks prime real estate. The dual approach also provides flexibility for repositioning if your food layout changes mid-event.
I discovered this accidentally when I split one large arrangement into two smaller ones to photograph them separately, then realized the dual setup functioned infinitely better on my actual buffet than the single piece ever had.
1. Matching End Bookends Creating Frame
Position identical 8×6 inch troughs at buffet’s opposite ends, each holding 6-8 tulips in matching colors. The symmetry creates intentional framing while end placement preserves central area for serving. The matching design signals coordinated aesthetic rather than random placement. This works brilliantly on buffets 5+ feet long where end positions feel purposeful.
2. Asymmetric Sizes Creating Visual Tension
Use two different-sized troughs, maybe 12×6 inches at one end with 10-12 stems, and 8×4 inches at the other with 5-6 stems, creating asymmetric balance more interesting than rigid symmetry. The size variation adds sophisticated tension while both end positions still preserve central serving area. The larger arrangement anchors one end while smaller piece balances without matching.
3. Staggered Front-to-Back Depth Positioning
Position one mini centerpiece at buffet’s front corner, another at the opposite back corner, creating diagonal relationship and depth perception. Use 8×6 inch troughs with 7-9 stems each. The staggered depth prevents side-by-side monotony while the corner positions stay out of serving zones. This creates dimensional interest visible from multiple viewing angles around the buffet.
4. Color-Coordinated Complementary Pairing
Use two mini arrangements in complementary colors, perhaps coral tulips in one trough, white in the other, creating color conversation across buffet span. Each uses 8×6 inch vessels with 8-10 stems. The color relationship creates cohesion despite spatial separation. Position at buffet ends where both remain visible simultaneously creating color dialogue.
5. Height-Varied Pairing for Dimensional Interest
Create one ultra-low arrangement (3-inch total height) and one slightly taller (6-inch height), positioning at opposite ends creating varied silhouette. The height difference adds sophistication beyond uniform heights. Use 8×6 inch troughs with 6-8 stems each. The variation creates visual interest while both stay low enough maintaining sightlines.
The dual centerpiece approach multiplies impact through strategic positioning, and the bar cart ideas ahead adapt these principles to mobile serving platforms.
Ideas for Spring Tulips Buffet Centerpieces on Outdoor Bar Carts That Keep Food First
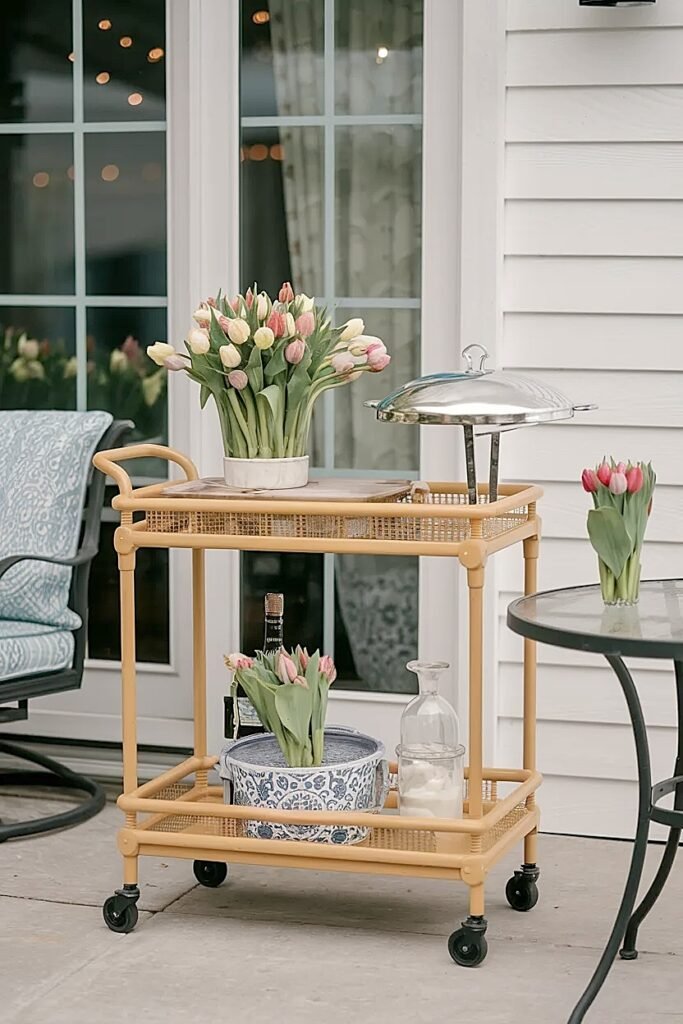
Bar carts present unique opportunities and challenges, they’re mobile, multi-tiered, and typically smaller than standard buffets, requiring different centerpiece strategies. The tiered structure means you can dedicate one tier to florals while others serve functional roles, but choosing which tier matters enormously for maintaining food-first priorities.
I default to using the top tier for tulips on bar carts, preserving middle and bottom tiers for actual serving use, this creates visual crown while functional tiers remain accessible.
1. Top Tier Exclusive Floral Display
Dedicate cart’s top tier entirely to one substantial tulip arrangement in 12×6 inch trough with 10-12 stems, while middle and bottom tiers hold serving dishes and drinks exclusively. The top tier’s prominence makes it ideal for floral showcase while functional tiers below handle actual service. This creates clear hierarchy, beauty above, function below. The separation prevents any conflict between aesthetics and utility during actual use.
2. Corner Mini on Each Tier Creating Vertical Rhythm
Position tiny 6×4 inch troughs with 4-5 stems at one corner of each tier, creating vertical alignment of floral accents without claiming significant surface space. The corner positioning leaves maximum tier surface for serving use. The vertical rhythm through all three tiers creates cohesive design. The compact vessels preserve functionality while adding beauty.
3. Back-Edge Linear Arrangement Across Top Tier
Position narrow trough (16×4 inches) along top tier’s back edge with 8-10 stems, leaving front area clear for featured bottles or serving pieces. The back positioning creates backdrop without obstruction. The narrow 4-inch width preserves depth for functional items. This works when cart backs against wall or railing where rear positioning feels natural.
4. Hanging Installation from Cart Frame
Suspend small hanging basket from cart’s frame or handle with 6-8 trailing tulips, creating overhead floral interest without claiming any tier surface. The suspended arrangement adds vertical dimension while liberating all cart surfaces for serving. Requires cart with sturdy frame capable of supporting hanging weight. The overhead position creates unexpected interest.
5. Bottom Shelf Foundation Planting
Position wider trough (14×8 inches) on cart’s bottom shelf with 12-15 stems creating lush foundation visible from all angles while upper tiers remain completely clear for serving. The bottom placement keeps flowers out of active serving zone while visible fullness creates attractive cart base. This inverts typical hierarchy creating unconventional but functional solution.
The bar cart strategies adapt to mobile platforms, and the runner placement concepts ahead address linear arrangements on elongated surfaces.
Ways to Use a Long Runner Space with Spring Tulips Buffet Centerpieces Without Crowding
Long narrow buffets or serving tables often feature runners, fabric strips running the table’s length, creating temptation to line them with continuous floral arrangements. But continuous placement creates problematic crowding, blocking serving access and leaving no gaps for setting down utensils or dishes mid-service.
The solution: strategic gaps creating floral zones separated by clear functional spaces.
1. Thirds Division with Center and End Clusters
Divide runner into thirds, positioning 8×6 inch troughs with 8-10 tulips at center third and both end thirds, leaving the two intermediate thirds completely empty for serving logistics. This creates three floral zones separated by functional gaps where serving dishes and utensils can live during service. The even spacing creates rhythm while gaps preserve utility. The center and end positions provide sufficient floral presence without continuous crowding that would obstruct actual buffet use.
2. Alternating Pattern with 18-Inch Gaps
Position 10×6 inch troughs every 36 inches along runner length creating alternating pattern of florals and functional gaps. Each trough holds 8-10 stems. The 18-inch gaps between arrangements provide substantial clear zones for serving dish placement and utensil access. This works on extended buffets 8+ feet long where multiple arrangements create rhythm without continuous crowding. The pattern prevents randomness while the gaps maintain functionality crucial for actual food service.
3. End-Cap Concentration with Clear Center Run
Place two substantial 14×8 inch troughs at runner’s extreme ends with 12-15 stems each, leaving the entire central span completely clear for serving dishes. The end-cap placement creates bookend framing while the clear center provides maximum functional surface. This works brilliantly when your buffet’s central area needs preserving for multiple large serving platters or when traffic flow requires central access points. The concentrated end presence delivers visual impact through position rather than continuous placement.
Conclusion
Creating spring tulip centerpieces for buffets demands prioritizing food service over floral display, a mental shift that initially feels wrong but produces infinitely better results. Position serving dishes first, centerpieces last in remaining gaps. Choose low narrow troughs over circular bowls, maximizing visual presence while minimizing surface claims. Favor back-edge or end placements over central positions that interfere with serving flow. Consider two small arrangements over one large piece that blocks prime buffet real estate. And always remember: if your centerpiece requires moving before guests can serve themselves comfortably, it’s failed regardless of beauty. These food-first strategies create buffet centerpieces that enhance outdoor entertaining rather than complicating it.
This website contains affiliate links, and some products are gifted by the brand to test. As an Amazon Associate, I earn from qualified purchases. Some of the content on this website was researched and created with the assistance of AI technology.