This website contains affiliate links, and some products are gifted by the brand to test. As an Amazon Associate, I earn from qualified purchases. Some of the content on this website was researched and created with the assistance of AI technology.
Key Takeaways
- Tight clustering with deliberate negative space creates perceived fullness better than uniform dense planting
- Base collar greenery tricks eyes into reading arrangements as larger than actual plant count suggests
- Height layering through stem length manipulation adds volume without increasing tulip numbers
- Hidden soil-level filler raises bulbs to optimal display height without cramping root space
- Two coordinated smaller planters consistently outperform one overstuffed container visually and practically
Making spring tulips planters look full without overstuffing them requires accepting a counterintuitive truth that took me three embarrassing planting seasons to learn: perceived fullness comes from strategic placement, not maximum density. I spent those years jamming bulbs into every square inch of container space, producing planters so overcrowded that stems competed for light, blooms knocked against each other during breezes, and the entire arrangement looked like a botanical traffic jam rather than intentional design. More plants, worse results. Every time.
The overstuffing instinct makes emotional sense, abundance feels generous, generous feels full, full feels successful. But plant arrangements follow visual rules closer to interior design than botany. Negative space creates contrast that makes present elements feel significant. Strategic clustering creates focal weight that reads as generous even when actual plant count stays modest. The gap between a planter that stops foot traffic and one that barely registers often has nothing to do with how many tulips are in it and everything to do with where those tulips sit relative to each other and the container.
This quick guide helps you make Spring Tulips planters look full without overstuffing. Pick the right silhouette, use base collars and rim halos, and choose layout tricks that keep tables and counters usable. Tap the copy buttons to grab a checklist you can follow every time you build a planter.
Spring Tulips Planters: Full Look Without Overstuffing
Use silhouette, spacing, and clean base finishing to create fullness. The goal is a wider outline and better depth—not more stems jammed in.
| Method | Best for | How it creates “fullness” | Do / Avoid |
|---|---|---|---|
| Outdoor + IndoorTight Cluster + Breathing Room | Tables, counters, entry consoles | Makes tulips read “dense” while gaps prevent the stuffed look |
DO: 1–2 clean gaps + moss top
AVOID: filling every inch |
| Outdoor + IndoorBase Collar (Low Green Ring) | Any container that needs width | Widened footprint without adding tulip volume |
DO: collar low + even
AVOID: tall filler greens |
| Outdoor + IndoorRim Halo (Inside-Edge Ring) | Wide bowls + patio planters | Creates a wider silhouette and cleaner edge definition |
DO: thin ring inside rim
AVOID: messy overhang |
| OutdoorHeight Layering (Tall-Back, Low-Front) | Steps, porch planters, entry seating | Depth makes the planter feel fuller from the sidewalk |
DO: 3 height zones
AVOID: one flat level |
| IndoorLow Dome Silhouette | Dining tables + coffee tables | Wide footprint + low profile = full look without bulk |
DO: dome wider than tall
AVOID: tall center spikes |
| Outdoor + IndoorMini Repeat (Second Small Planter) | Rooms that feel “empty” | Full space effect without stuffing one pot |
DO: repeat once nearby
AVOID: too many repeats |
| IndoorFront-Heavy, Back-Open | Entry tables against a wall | Fullness from the viewing side without packing the back |
DO: load the front view
AVOID: stuffing the wall side |
| IndoorColor Banding | Low centerpieces | Grouped color reads denser than scattered stems |
DO: band colors in blocks
AVOID: random mixing everywhere |
Silhouette + spacing methods
Dense clusters + 1–2 clean gaps. Finish with moss.
Wide footprint, low height. Great for dining tables.
Tall-back, low-front depth for a fuller look.
Widening tricks without more tulips
Low ring to widen the footprint without bulk.
Thin inside-edge ring for a wider silhouette.
Second small planter makes the space feel fuller.
Placement tricks for real-life surfaces
Full from the room view without stuffing the wall side.
Grouped color reads denser than scattered stems.
How to Use the “Tight Cluster + Breathing Room” Rule for Spring Tulips Outdoor Planters
The tight cluster principle divides any planter into two distinct zones: a concentrated central grouping containing all your tulips, and deliberate surrounding space occupied only by low greenery or exposed soil. Most people spread plants uniformly across container surfaces, creating even distribution that paradoxically reads as sparse rather than abundant.
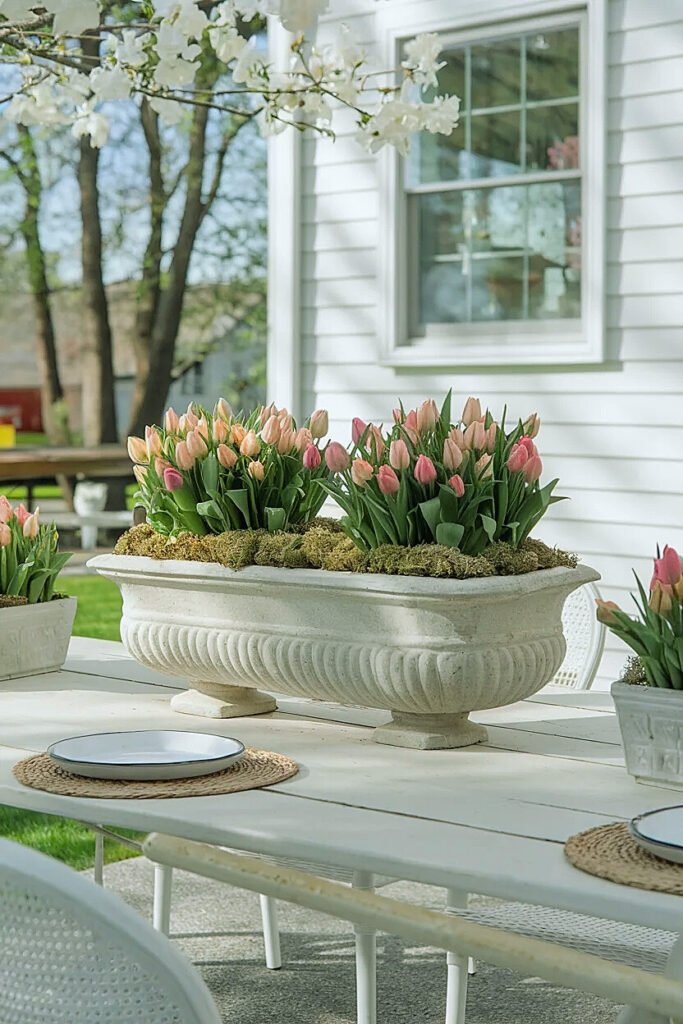
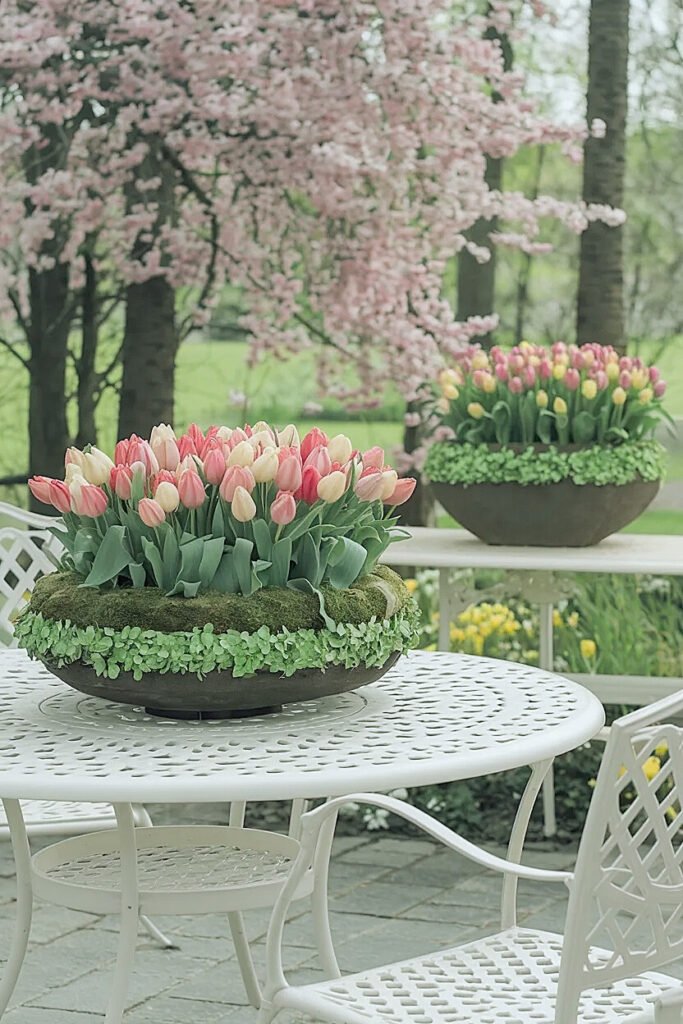
Nine tulips planted tightly in a seven-inch cluster within a fourteen-inch container consistently reads as fuller than those same nine tulips spread uniformly across the entire surface. I’ve tested this side-by-side and the clustered version wins every time visitors estimate which looks more generous. The clustering creates visual mass with defined edges, while spread-out planting creates a polka-dot effect where individual plants register separately rather than as collective abundance.
I plant tulip bulbs with approximately two inches of space between them in a defined circular or oval grouping occupying roughly half the container’s total surface area. The remaining half stays deliberately empty, no tulips, just low-growing base greenery like thyme or lamb’s ear that reads as supporting cast rather than competing focal points. This half-and-half division feels wrong during planting when bare soil is visible, but once tulips emerge and bloom, the proportions resolve into exactly the right balance.
Testing your cluster before committing helps enormously. I position unplanted bulbs on the soil surface, step back six feet, and evaluate the composition from normal viewing distance. Adjusting bulb positions at this stage costs nothing, while adjusting after planting means disrupting root development. The two minutes spent previewing saves hours of wondering why the finished planter doesn’t match the mental image. If you’re exploring greenery companion choices that enhance rather than crowd tulip planters, there are specific varieties that integrate beautifully with the tight cluster approach, share this with anyone tackling spring planter projects!
The clustering principle underpins every other technique in this article, and the base collar concepts ahead show how to use greenery to enhance the visual weight clustering creates.
What Are the Best “Base Collar” Greens to Make Spring Tulips Outdoor Planters Look Full

Base collars, rings of low-growing greenery surrounding tight tulip clusters, amplify perceived fullness by creating visual expansion at the planter’s soil level. Without this collar, the cluster floats in empty space and reads as a collection of individual stems. With it, the entire container surface reads as occupied without actually being stuffed with competing plants.
The collar greenery needs to stay genuinely low, under six inches, so it never competes with tulip blooms for visual attention. The job is coverage, not presence.
1. Creeping Jenny for Golden-Green Coverage
Creeping Jenny spreads rapidly across soil surfaces creating dense golden-green coverage that fills containers within two to three weeks of planting. I use it as base collar by tucking four to six small starts around the outer perimeter of my tulip cluster, allowing the spreading stems to fill soil surface moving outward toward container edges. The yellowish-green color complements most tulip colors without competing, it reads as background. The rapid spreading means I get coverage quickly while the low growth habit ensures it never rises into bloom territory. Trim any vertical stems immediately since horizontal coverage is the goal.
2. Moss as Instant Coverage Without Growth Concerns
Sheet moss provides instant base collar without the growing-in wait that live plants require. I press preserved sheet moss gently against exposed soil surface between and around tulip stems, covering everything from the cluster’s outer edge to the container rim. The moss reads as intentional ground cover, creating lush green texture that makes planters look professionally finished immediately after installation. Unlike live spreaders, moss requires zero maintenance and won’t overgrow or compete. Replace it midseason if it starts looking tired, a ten-dollar bag covers three or four planters completely.
3. Lamb’s Ear for Silvery Textural Contrast
Lamb’s ear’s silvery fuzzy foliage provides base collar coverage with significant added value: the silver-gray tone makes any tulip color more vivid through color contrast while the velvety texture adds tactile interest. I use three to four small starts positioned around the outer ring of my tulip cluster, allowing them to spread outward covering soil surface without crowding the cluster’s center. The spreading habit stays slower than Creeping Jenny, requiring about four weeks to achieve full coverage but lasting longer without needing trimming. The silver color photographs exceptionally well in outdoor planter shots.
These base collar approaches reveal how ground-level coverage dramatically changes arrangement perception, and the height layering techniques ahead show how to add apparent volume through elevation rather than plant count.
How to Layer Heights in Spring Tulips Outdoor Planters Without Adding More Stems
Height variation within a planter creates depth perception that reads as fullness, when your eye has to travel through multiple elevations, it perceives more material than flat uniform planting contains. Achieving this variation without adding stems requires manipulating planting depth rather than plant count.
The technique: plant bulbs at three different depths within the same container. Standard planting depth recommendations treat containers like ground beds, but containers give you control over exactly how high each bulb sits relative to the soil surface. Plant one-third of your bulbs two inches shallower than standard, one-third at standard depth, and one-third two inches deeper. These graduated depths produce tulips emerging at three distinct height levels, creating natural tiering that looks like professional planting containing far more stems.
I mark my three planting depths with stakes before dropping in any bulbs, keeping consistent groups in consistent positions, deepest bulbs at the back of the cluster, standard depths in the middle, shallowest at the front. This intentional arrangement creates front-to-back height progression mimicking how professional designers would position distinct tulip varieties of varying heights. The result: twelve bulbs that look like eighteen through cleverly staggered elevation.
Wind behavior reinforces this technique’s value. Mixed-height tulips move independently in breezes rather than swaying uniformly, creating organic motion that reads as abundant life rather than rigid mass. That visual movement amplifies perceived fullness in ways that static uniform-height arrangements simply can’t replicate.
These height strategies create the illusion of abundance through elevation, and the hidden filler ideas ahead address how to use physical volume under the soil line.
What Are the Best “Hidden Filler” Tricks Under Spring Tulips Outdoor Planters (No Stuffing)
Raising the effective soil level within containers positions bulbs higher, creating better bloom presentation while making arrangements appear full from the viewer’s perspective rather than sitting low in the container where they partially disappear.
1. Inverted Nursery Pot as Soil Raiser
Place an inverted four-inch or six-inch nursery pot at the container’s center before adding soil, creating an elevated planting platform that raises your tulip cluster to the container’s upper third. This reduces the soil volume needed while positioning blooms where viewers actually see them rather than buried deep in the container. The inverted pot occupies significant volume without adding weight, which matters for heavy ceramic containers on porches.
2. Gravel Base Layer for Drainage and Elevation
Fill the bottom third of your container with pea gravel before adding planting soil. This elevates the soil layer, reducing the depth bulbs need to be planted while maintaining appropriate soil depth for healthy root development. The gravel also improves drainage preventing bulb rot, so this trick serves double duty as both visual enhancement and practical growing improvement.
3. Cardboard Disc Platform Under Soil
Trace your container’s interior diameter onto corrugated cardboard, cut slightly smaller, and place it inside before adding soil. This raises the soil level by roughly two inches, enough to meaningfully affect bloom height visibility without compromising planting depth. The cardboard breaks down naturally over the season causing zero long-term issues. A free technique using material heading toward recycling anyway.
These hidden filler approaches solve the low-visibility problem many container planters face, and the dual planter concepts ahead demonstrate how two containers create more impact than one.
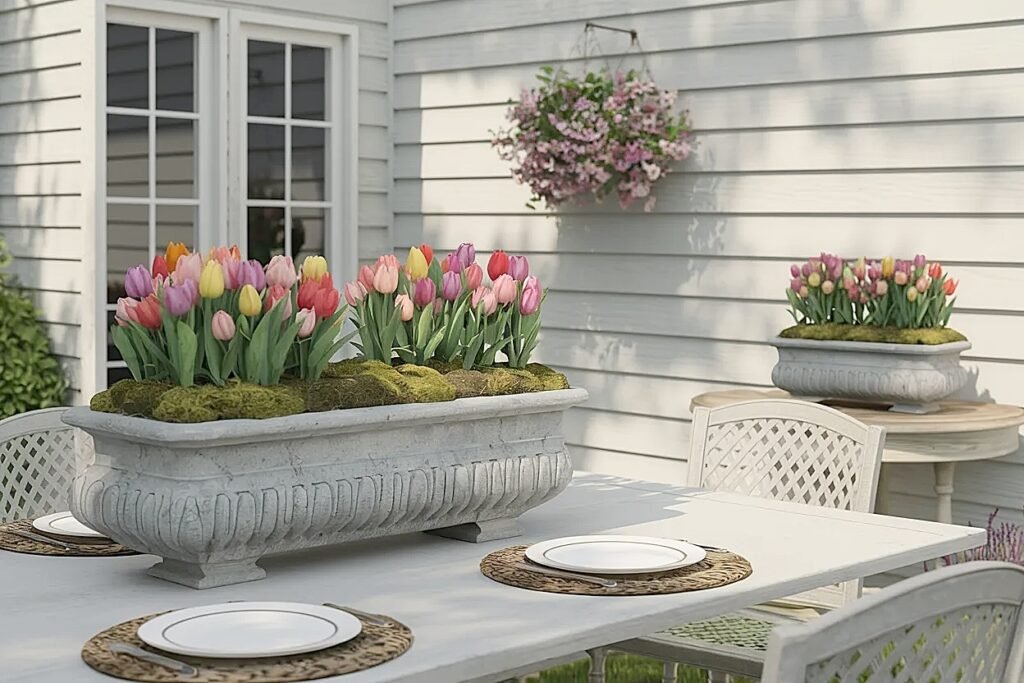
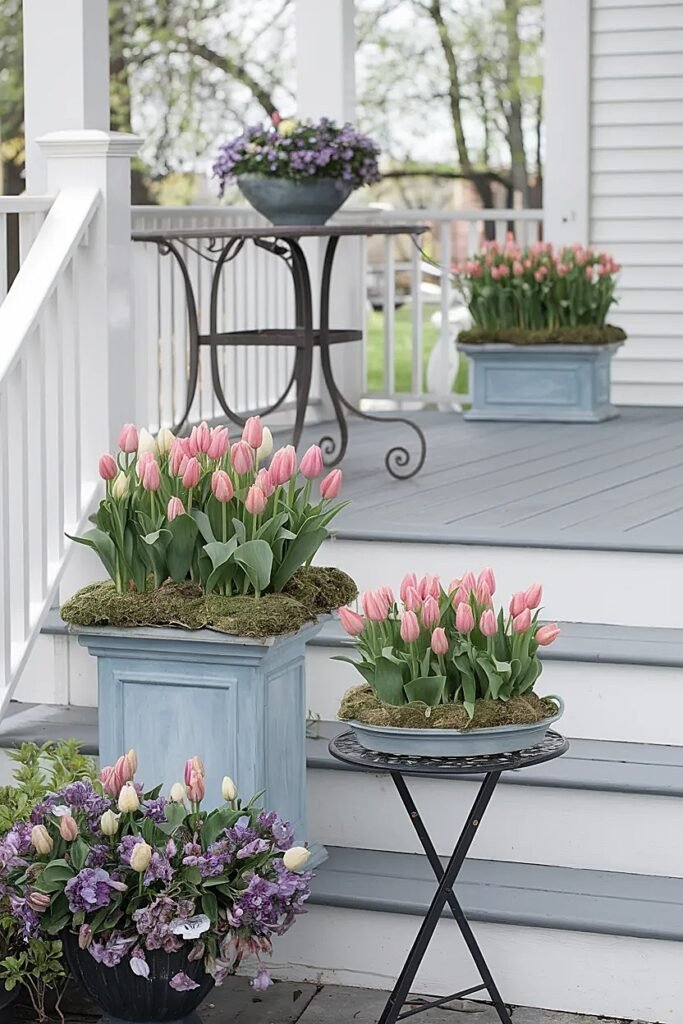
Ideas for Using Two Smaller Spring Tulips Outdoor Planters Instead of One Overstuffed Planter
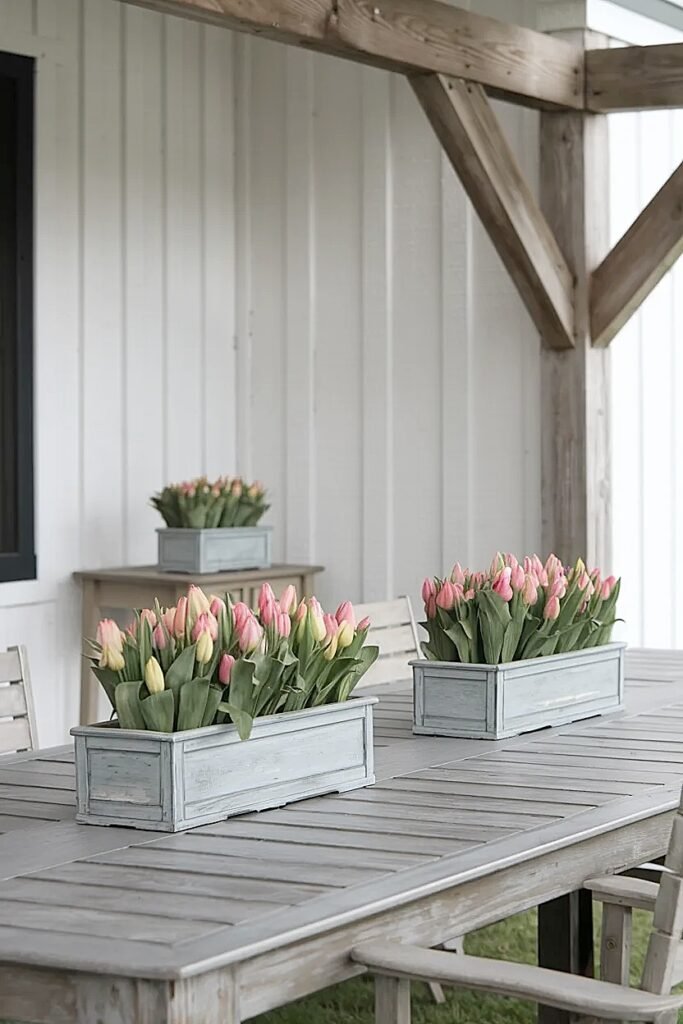
Two planters allow composition control that single containers never achieve, you can position them in conversation with each other, create visual tension through spacing, and adjust placement throughout the season.
1. Asymmetric Offset Pairing
Position two planters at slightly different heights and distances from the entry point, creating asymmetric balance rather than rigid symmetry. The offset creates visual interest that identical paired positioning never generates. I use risers under one planter to create a four-inch height difference that adds dimension.
2. Same Color, Different Heights
Use matching containers but plant shorter early tulips in one and taller late varieties in the other, creating sequential bloom timing that keeps the pairing interesting across a longer season rather than peaking simultaneously.
3. Complementary Color Split
Plant cool-toned tulips in one container and warm tones in the other, allowing the pairing to create color conversation. White and lavender in one, coral and yellow in the other creates sophistication that mixing colors within a single overstuffed planter never achieves.
4. Gateway Flanking at Door or Steps
Position one container on each side of a doorway or stairway entrance, creating botanical gateway that draws people through rather than merely displaying plants at them. The two-planter gateway creates architectural effect that single containers can’t replicate regardless of size.
5. Staggered Depth Placement
Position one planter at the table or step edge and one eighteen inches behind it, creating spatial depth that makes the arrangement appear larger than either container alone. The staggered placement reads as considered rather than incidental.
These dual planter ideas demonstrate that composition strategy matters more than container size, and the container shape guidance ahead addresses how vessel geometry affects perceived fullness.
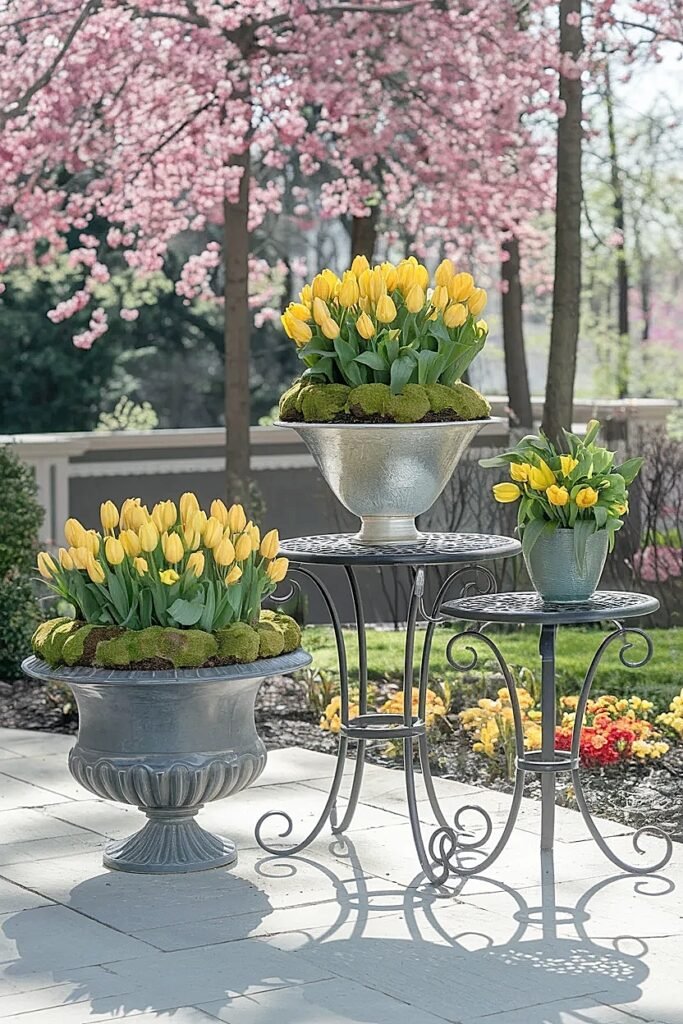
What Are the Best Container Shapes to Make Spring Tulips Outdoor Planters Look Full Without Overstuffing
Container shape dramatically influences fullness perception before a single plant goes in. Certain shapes flatter modest planting counts while others expose sparseness relentlessly.
1. Tapered Urns with Narrow Bases
Tapered urns widen at the top, concentrating all visual attention upward where blooms appear while the narrow base creates visual elegance. Twelve tulips in an urn with an eight-inch base look more substantial than the same twelve tulips in a flat-bottomed container twice as wide, simply because the urn’s form concentrates composition rather than dispersing it. I use classic terra cotta urns between ten and fourteen inches mouth diameter, finding that this range accommodates meaningful tulip counts while maintaining proportional elegance.
2. Tall Narrow Cylinders for Vertical Drama
Tall cylindrical containers, think twelve inches tall by eight inches diameter, create vertical emphasis that amplifies tulips’ naturally upright form rather than fighting it. The narrow diameter means modest tulip counts fill the opening completely while the height creates proportional drama. I plant nine bulbs in an eight-inch cylinder and they look abundant because the container scale matches the planting count perfectly.
3. Wide Shallow Bowls for Clustered Mass
Paradoxically, very wide shallow bowls work brilliantly when combined with the tight cluster principle, plant everything in a dense central mass and the wide empty bowl perimeter frames that mass as deliberate focal point. The bowl’s generous scale makes the cluster read as concentrated abundance rather than sparse planting.
These container shapes work with rather than against modest planting counts, and the kitchen counter techniques ahead address indoor display challenges.
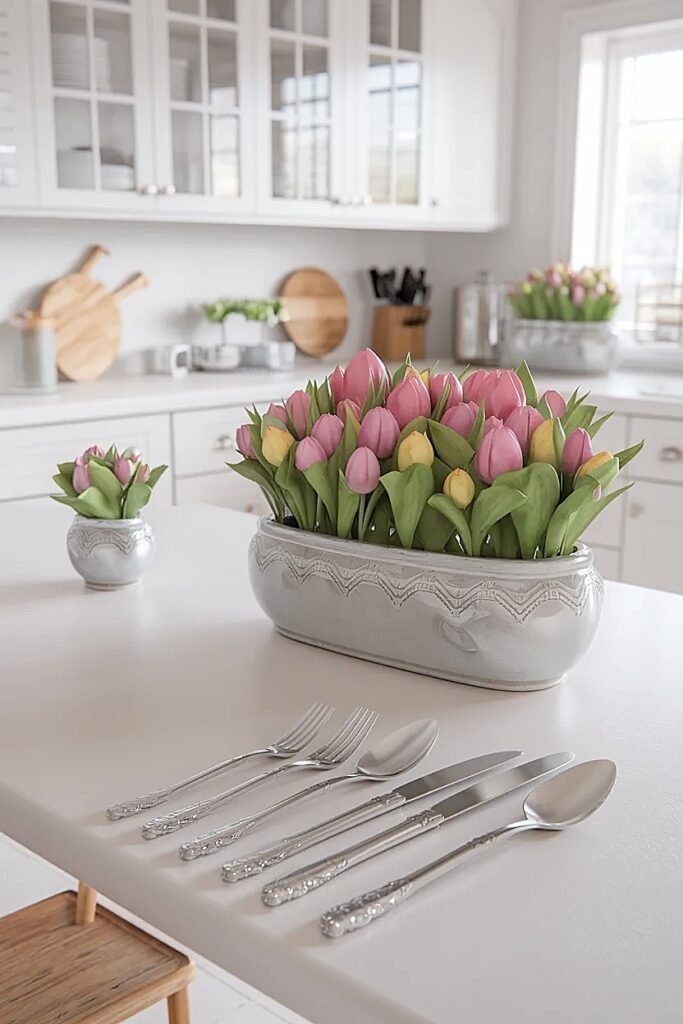
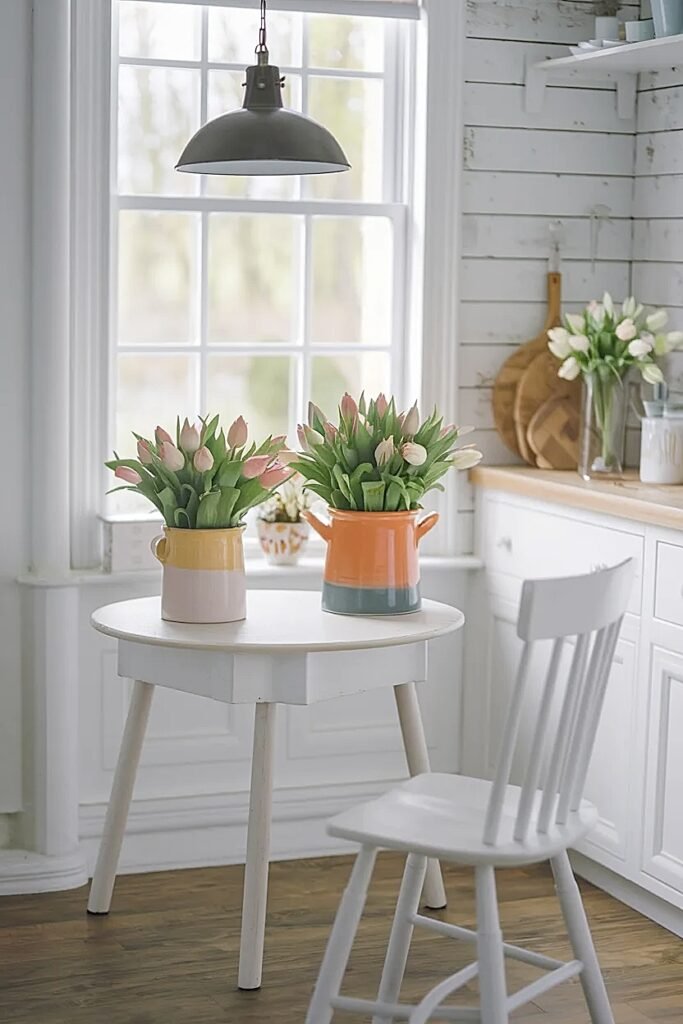
How to Make Spring Tulips Kitchen Counter Planters Look Full Without Crowding Prep Space
Kitchen counter planters face dual constraints: they need to look full and beautiful while remaining compact enough not to interfere with cooking activities. The answer lies in vertical emphasis rather than horizontal spread, building upward where kitchen airspace is available rather than outward where prep space is needed.
I use narrow, tall containers on kitchen counters, never wide shallow bowls that sprawl into the workspace. A six-inch-diameter container placed at the counter’s back edge can hold nine tulip bulbs in a tight cluster while occupying just six inches of counter depth. That footprint is smaller than most appliances already living on my counter permanently.
The tight cluster principle intensifies for kitchen applications. I plant all nine bulbs within a four-inch central cluster, leaving the container perimeter for lamb’s ear or moss that stays under three inches tall. The composition rises vertically through tulip stems rather than spreading horizontally, making it visually generous while physically contained.
Position matters enormously. Counters have natural “dead zones”, the back corners near walls where nothing functional happens. These spots receive zero action during cooking but remain visible from kitchen entry points and dining areas. Tulip planters belong there and nowhere else on kitchen counters.
These counter-specific principles balance aesthetic ambition with kitchen functionality, and the small container hacks ahead address maximizing impact when size is the primary constraint.
What Are the Best “Small Container” Hacks to Make Spring Tulips Indoor Planters Look Full
1. Mirror Tray Base Reflection Doubling
Set a small tulip planter on a mirrored tray. The reflection appears to double the arrangement’s depth while adding light and sparkle that amplifies visual presence. I use rectangular mirror trays from home goods stores, positioning them to reflect planter sides rather than just the bottom for maximum depth effect.
2. Cluster Three Tiny Pots as One Unit
Group three four-inch pots holding three tulips each, positioning them touching in triangular formation. Viewers read the grouped trio as single generous arrangement containing nine tulips rather than three separate sparse planters. The grouping trick adds apparent scale instantly.
3. Elevated Platform for Height Drama
Place small planters on wood rounds, book stacks, or vintage tins raising them four to six inches above the surface. The elevation creates shadow beneath the planter and positions blooms at better viewing angles, making modest arrangements read as intentional elevated display.
4. White or Light Containers for Visual Expansion
Light-colored containers recede visually, making plant contents appear larger by eliminating dark visual mass at the arrangement’s base. Dark containers read as heavy and prominent, pulling attention downward. Cream, white, or pale gray containers shift attention upward to blooms.
5. Single Statement Stem in Bud Vase Clusters
Rather than fighting small container constraints, embrace minimalism with three to five individual bud vases each holding one perfect tulip. Group them asymmetrically at varying heights. The individual showcasing makes each stem feel intentional rather than insufficient.
Conclusion
Fullness in tulip planters is an optical construction, not a plant count achievement. Every technique here works on the same underlying principle: directing where eyes travel and what they compare against. Cluster positioning creates mass through concentration. Base collars create coverage through low-maintenance companions. Height variation creates depth through elevation manipulation. The planters that stop people mid-stride on my porch aren’t the most densely planted, they’re the most intentionally organized. Start with the tight cluster rule this season, observe how dramatically it changes perception, and you’ll never overcrowd a container again.
This website contains affiliate links, and some products are gifted by the brand to test. As an Amazon Associate, I earn from qualified purchases. Some of the content on this website was researched and created with the assistance of AI technology.