This website contains affiliate links, and some products are gifted by the brand to test. As an Amazon Associate, I earn from qualified purchases. Some of the content on this website was researched and created with the assistance of AI technology.
Key Takeaways
- Welcome table tulips need offset positioning that leaves door swing clearance and functional surface space for packages
- Porch bench arrangements work best at extreme ends or on the floor behind the bench to preserve seating capacity
- Rail ledge displays require squat, wide vessels with weighted bases to withstand wind and accidental contact
- Step tulips must sit at outer edges beyond normal foot traffic paths to avoid getting kicked during daily use
- Swing-adjacent placements work better than swing-mounted installations since movement creates instability and tangles
Styling spring tulips for your porch bench, step, swing, and welcome table transforms your home’s entrance from purely functional to genuinely inviting, but only if you place those flowers where they’ll actually survive daily porch activity. I’ve positioned enough tulip arrangements in spots that seemed perfect until real life intervened, the door smacked them, someone’s boot sent them flying, or they toppled off a railing during a moderate breeze. These failures taught me that porch styling demands respect for how spaces actually get used, not just how they photograph.
Porches aren’t static display zones. They’re active thresholds where people juggle groceries, fumble with keys, set down packages, lean against railings, and navigate steps while distracted by phone calls. Your tulip placements need to anticipate this chaos rather than hoping everyone will suddenly become more careful around your beautiful arrangements. The techniques I’m sharing emerged from observing actual porch behavior, watching where people naturally walk, where they instinctively grab for support, and which surfaces they treat as functional versus decorative. This real-world approach prevents the heartbreak of crushed tulips and creates arrangements that enhance rather than complicate daily porch life.
Use this porch-to-home checklist to style Spring Tulips with confidence. It tells you where to place tulips on benches, steps, swings, and welcome tables without blocking traffic or making surfaces messy. It also shows how to echo the palette indoors for a cozy farmhouse flow. Tap to expand, then copy.
Spring Tulips Porch-to-Home Styling Checklist
Use these quick rules to style benches, steps, swings, and welcome tables outdoors—then echo the palette indoors without clutter.
| Spot | Placement rule | Make it photo-clean | Quick checklist |
|---|---|---|---|
OutdoorWelcome table
|
|
|
|
OutdoorPorch bench
|
|
|
|
OutdoorPorch steps
|
|
|
|
IndoorEntry console
|
|
|
|
Welcome table (Outdoor)
Basket slightly back. Leave tray space. Clear door lane.
3 colors max. Tight tulip dome. Greens hidden at base.
Low silhouette. Open lane. One mini repeat nearby.
Porch bench (Outdoor)
Basket on one end. Leave sit zone. Mini set back.
No outward sprawl. Keep tulips low. One texture layer.
Off-center. Stable container. Repeat color once.
Porch steps (Outdoor)
Corner + set-back. Avoid walking line. No edge placement.
Bold colors. Low dome. Remove clutter near baskets.
Low height. Sturdy baskets. 1 matching mini topside.
Entry console (Indoor)
Wall-side. Off-center crock. Keep tray space open.
Echo porch palette. One mini repeat only. Base greens.
Low + tight. Open keys zone. Repeat once (bench/counter).
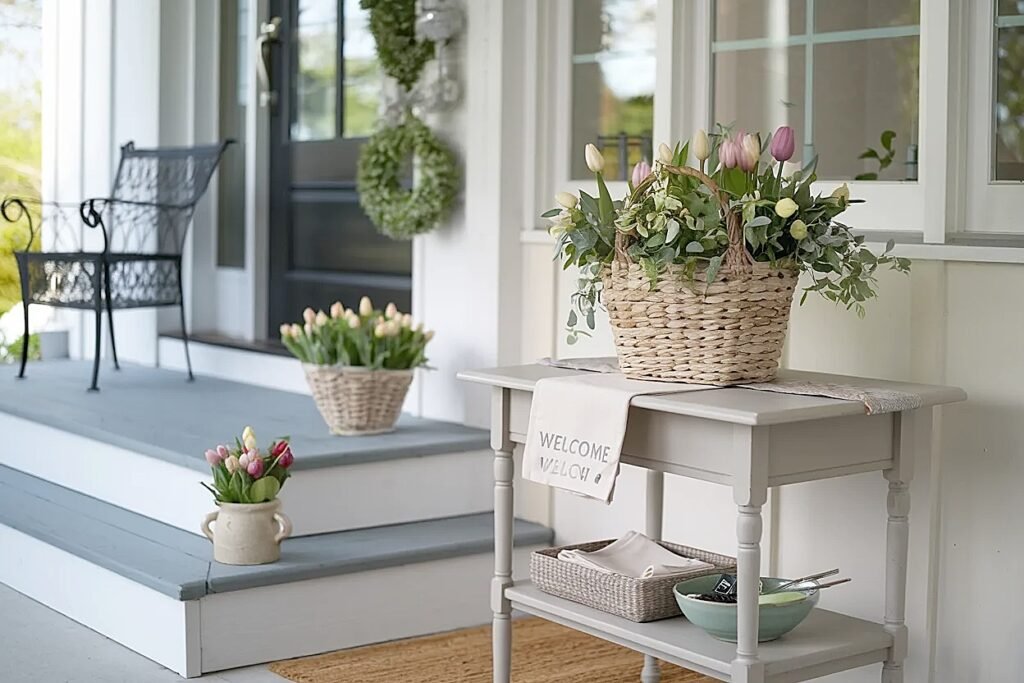
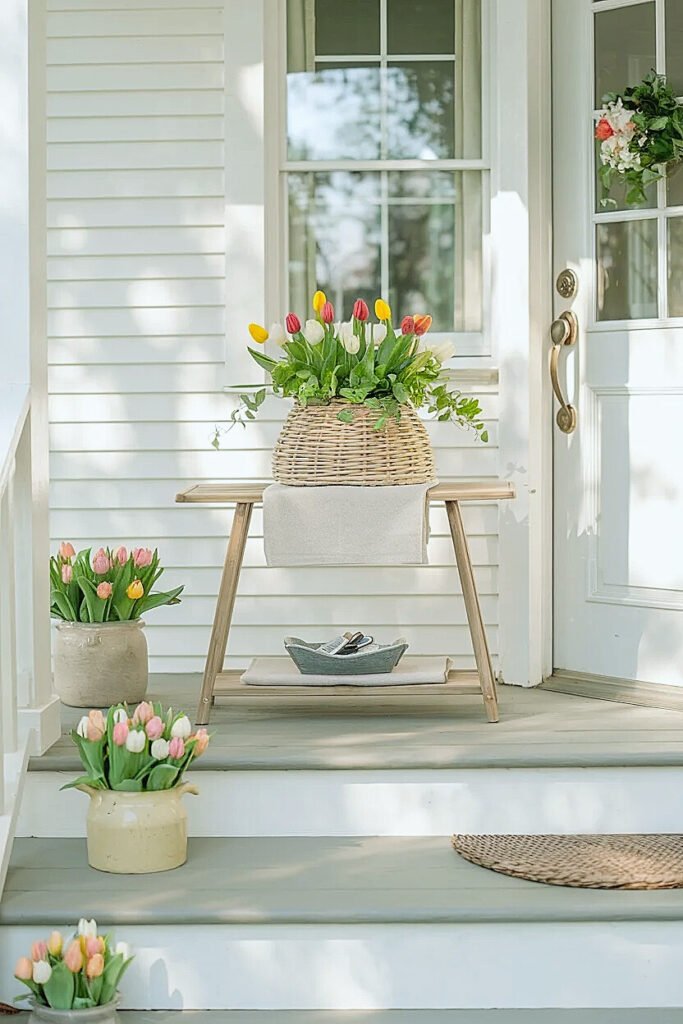
How to Style Spring Tulips on a Welcome Table Without Blocking the Door
Welcome tables occupy prime real estate in that crucial zone beside your front door where aesthetics constantly compete with logistics. You want gorgeous tulips creating that first-impression magic, but this same small surface handles endless practical moments, keys landing, mail stacking, delivery notifications getting signed. I positioned a spectacular tulip arrangement dead center on my welcome table last April, creating perfect symmetry that lasted exactly until I tried carrying in a pizza box while opening the door. The door caught the basket edge, and suddenly I had tulips scattered across the porch along with my dignity.
That disaster taught me to map the door’s complete swing pattern before placing anything on adjacent surfaces. Open your door fully, not just the polite crack you use for package handoffs, but the wide-open position you need when hauling furniture or carrying awkward items. Note exactly where that door edge travels throughout its arc, because that entire zone must remain permanently clear. Most doors swing ninety degrees or more, claiming way more space than you’d guess when they’re closed and looking innocent.
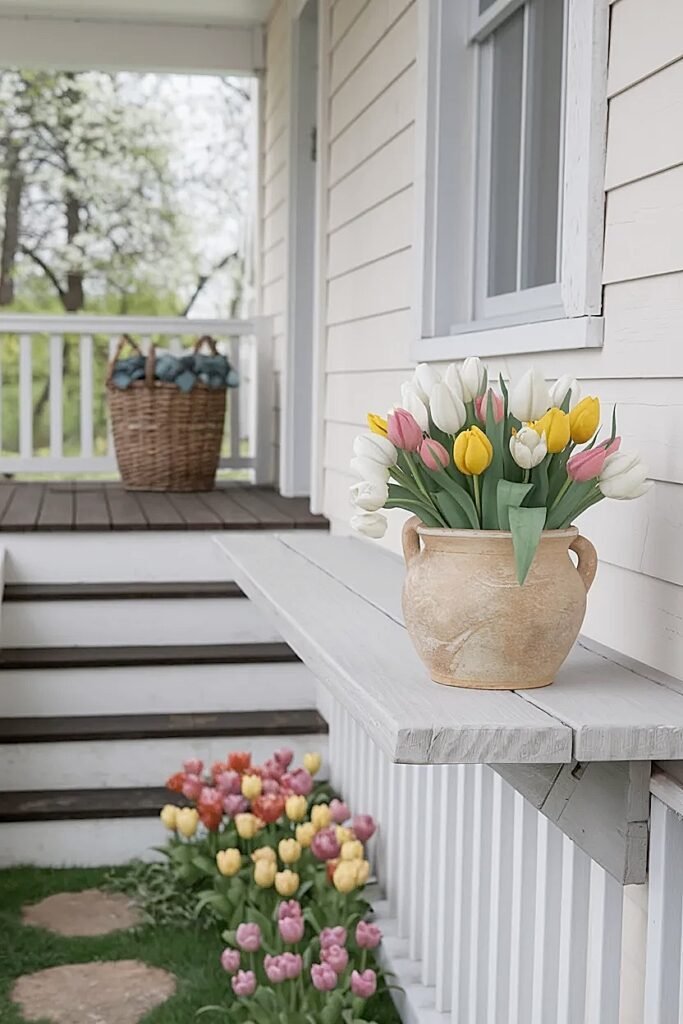
My current welcome table strategy pushes all tulip presence to the table’s far edge, the side opposite your door hinges where the swing arc won’t reach. If your door hinges on the left, tulips go right. This asymmetric placement might offend your symmetry-loving eye initially, but it’s the only position that survives daily door usage without constant rearranging. I keep the arrangement compact, ten inches diameter maximum, because welcome tables rarely exceed three feet in width, and you need substantial clear space for the inevitable moments when this surface becomes an emergency landing pad.
Height discipline matters more than most people realize. I cap welcome table tulips at nine inches total height, not for aesthetic reasons but because taller arrangements obstruct your ability to see through sidelights or peepholes when someone rings the bell. Security trumps floral drama every single time. The vessel needs serious weight, lightweight baskets get knocked around by door drafts or brushed aside when people rush through entries. I use only ceramic crocks or heavy resin containers that require deliberate effort to move rather than yielding to every accidental bump.
One absolute game-changer: I leave a minimum ten-inch zone of completely empty table surface on the hinge side. This creates a designated landing zone for packages, purses, or the random items people set down while wrestling with locks and door handles. The tulips stay safely in their assigned territory while this buffer zone absorbs the functional chaos, preventing your arrangement from getting buried under Amazon deliveries or shoved aside to make room, and for insights on selecting tulip colors that photograph beautifully in porch lighting, there’s excellent guidance worth checking out, share this with anyone tackling spring porch styling!
Welcome table positioning establishes your entire porch’s floral strategy, and the bench placement rules ahead address furniture that needs to balance decoration with its primary seating function.
What Are the Best Spring Tulips Placement Rules for a Porch Bench
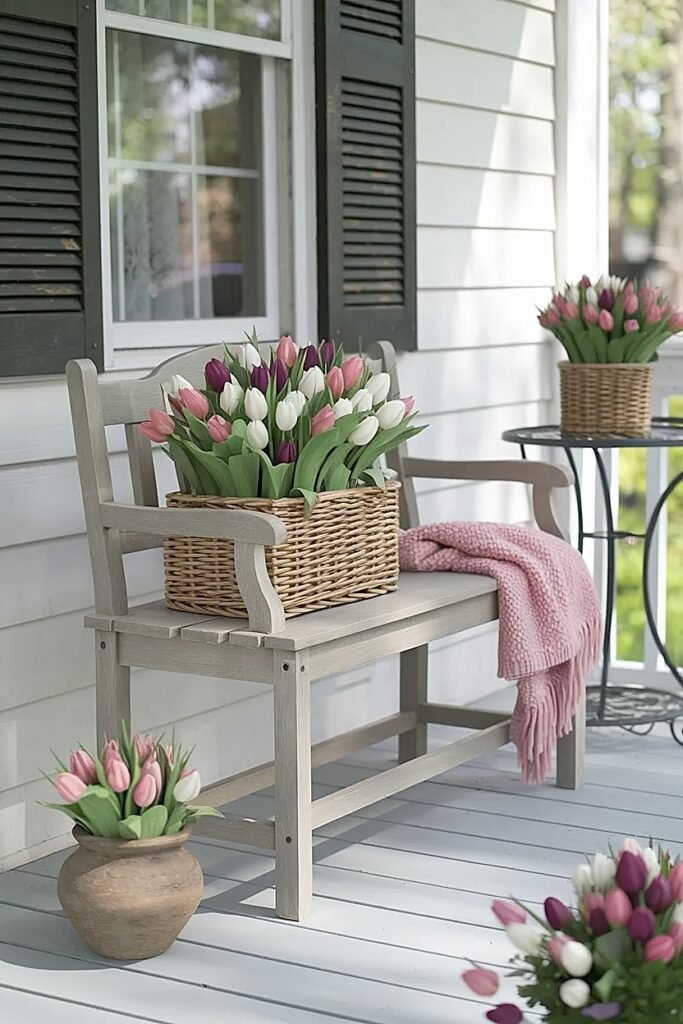
Porch benches seduce decorators into covering every inch with pillows, throws, and flowers until the actual seating function gets completely sacrificed to aesthetics. I’ve watched guests approach my beautifully styled bench, pause awkwardly, then choose to stand rather than disturb the decorative arrangement. That moment of hesitation tells you everything, your tulip placement has failed if it discourages the bench’s primary purpose.
The bench’s actual usage pattern should dictate every tulip decision. I spend time observing my porch bench across several days, noting who sits where and when. Does morning coffee happen there? Do kids drop backpacks on one end after school? Does anyone actually sit, or has this bench become purely decorative by default? These observations reveal which zones can accommodate tulips versus which must remain absolutely clear for functional use.
1. Extreme End Positioning with Seating Priority
Confine tulips exclusively to the bench’s farthest end, the point most distant from your entry door or primary traffic approach. Use a single basket measuring eight to ten inches in diameter, positioning it tight against the end rail or armrest where it occupies minimal linear space along the bench’s length. This strategy preserves at least 75% of bench surface for actual sitting while the concentrated floral moment creates intentional focal point rather than scattered decoration. The critical decision involves choosing which end sees less seating activity, spend several days observing before committing your tulips to a specific location.
2. Floor-Level Placement Behind Bench Back
Remove tulips from bench surface entirely by positioning a generous floor arrangement directly behind the bench back, creating lush backdrop visible to approaching visitors while leaving seating completely unobstructed. This works only when benches sit against walls, railings, or porch posts that provide backing structure. I use substantial baskets ranging from sixteen to twenty inches in diameter since floor placement removes the size constraints that bench surfaces impose. The generous scale creates impressive presence that makes the bench area feel intentionally styled rather than minimally decorated, while the 100% clear seating surface sends unmistakable welcome signals.
3. Elevated Hanging Display Above Bench Zone
Install overhead hanging elements suspended from porch ceiling beams or hooks positioned directly above the bench area, creating vertical floral interest while liberating the entire bench surface for sitting. This approach requires careful height measurement, hanging baskets must clear seated heads by minimum fourteen inches, typically positioning them around six feet eight inches from porch floor. I use baskets ten to twelve inches in diameter filled with tulips arranged to look attractive from below. This vertical strategy works brilliantly for benches in high-traffic zones where surface space is too precious to surrender to decoration.
These bench rules recognize that seating can’t be compromised for flowers, and the rail ledge guidance ahead tackles elevated placements requiring stability engineering.
How to Style Spring Tulips for a Porch Rail Ledge Look (Without Falling Risk)
Porch railings offer tantalizing linear display potential running your porch’s entire length at perfect viewing height, but these narrow elevated ledges create legitimate safety hazards when you start positioning vessels on four-to-six-inch-deep surfaces three feet above floor level. I’ve swept up enough broken pottery and rescued enough scattered tulips to approach rail placements with wariness bordering on over-caution. The physics work brutally against you, narrow base, elevated position, wind exposure, and occasional bumps from people leaning create a perfect storm for toppling disasters.
Wind represents your primary adversary on rail ledges. Even seemingly gentle breezes generate surprising force against arrangements perched on exposed narrow surfaces, and moderate gusts can send vessels tumbling before you register what’s happening. Factor in the inevitable moments when kids run hands along railings or adults lean against them for support, and you’re dealing with constant destabilizing forces that traditional vase arrangements simply can’t withstand.
My rail strategy rejects standard vases completely, instead favoring ultra-wide, ultra-low containers that fight physics through geometry. I’m selecting vessels no taller than three inches with bases measuring twelve inches or wider, proportions that look almost absurdly squat but create nearly topple-proof profiles. These pancake-format containers spread weight across maximum surface area while minimizing height, drastically reducing the leverage that wind and bumps use to generate tipping force. The low profile also decreases the sail effect where vertical surfaces catch wind.
Before any tulips enter these stable vessels, I engineer serious ballast. Three to four pounds of river rocks or glass marbles go into the container bottom, creating foundational mass that makes the empty vessel surprisingly heavy. Only after establishing this weighted base do I add water and arrange tulips, keeping floral heights to maximum six inches above container rim. The resulting arrangement spreads wide and sits low, resembling a floral pancake more than traditional upright displays, but this unconventional form prioritizes survival over convention.
I reinforce stability through invisible mounting solutions. Heavy-duty museum gel gets applied to every vessel base before positioning on rails, creating temporary adhesive bonds that prevent sliding or shifting during wind or contact. This gel holds firmly through normal weather but releases cleanly when I remove arrangements, leaving zero residue on painted or stained rail surfaces. For particularly exposed sections, I’ve used clear fishing line to lash containers to rail posts as backup security, the line is invisible from normal viewing distances but prevents catastrophic falls if primary stability measures somehow fail.
Material selection matters equally. I use only fully weatherproof containers, glazed ceramic, quality resin, or powder-coated metal, that can handle direct rain and sun exposure inherent to rail placement. Porous materials deteriorate rapidly in these exposed positions, and anything unsealed will stain or warp within weeks.
These rail techniques account for elevation and exposure challenges, and the step placement ideas ahead address ground-level zones with relentless foot traffic.
Ideas for Spring Tulips on Porch Steps That Don’t Get Kicked Over
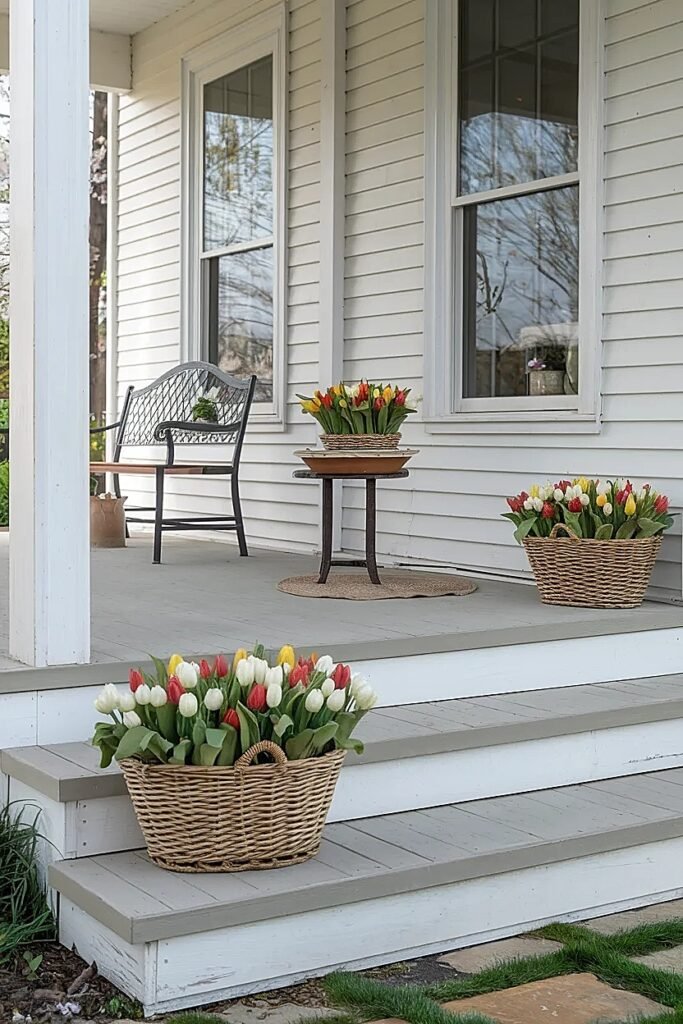
Porch steps represent legitimately hostile territory for floral arrangements since people navigate them while carrying items, rushing, or looking at phones rather than watching their feet. The probability of kicked vessels isn’t theoretical, it’s guaranteed unless you position tulips completely outside the natural traffic corridor that everyone follows ascending and descending. I treat steps as active circulation routes first and decorative opportunities second, if at all.
Most people climbing or descending stairs unconsciously follow a path centered on each tread, maintaining equal distance from both edges for balance and safety. This central channel extends roughly twenty inches wide on standard thirty-six-inch porch steps. Your tulips must live definitively outside this zone or accept their inevitable destruction.
1. Top Step Extreme Outer Corner Placement
Position a single weighted basket at the top step’s absolute outer corner, the junction where step meets wall or railing farthest from the typical foot placement zone. Use baskets minimum twelve inches in diameter with substantial weight, creating mass that requires deliberate force to displace rather than yielding to glancing contact. The top step location provides critical advantage, people climbing see the arrangement before reaching it, allowing conscious avoidance rather than surprised collision. The outer corner provides dual protection from both step edge and adjacent wall or railing, maximizing distance from traffic flow. Ensure minimum sixteen inches clearance between basket edge and the traffic lane’s nearest boundary.
2. Ground-Level Symmetrical Flanking at Stairway Base
Establish matching tulip installations on the ground at both sides of your bottom step, creating framed gateway that defines stairway entrance without occupying any step surface. Position these flanking arrangements approximately thirty inches from step side edges, far enough that even unusually wide-stance walkers won’t make contact during normal stair use. Ground placement provides inherent stability impossible on elevated step surfaces, while bilateral symmetry creates obviously intentional design that communicates “decorative boundary” rather than “misplaced obstacle.” Each flanking basket can reach generous proportions since ground positioning removes toppling concerns.
3. Adjacent Wall-Bracket Installation Beside Stairway
Eliminate all step and ground surface occupancy by mounting a sturdy wall bracket to the wall running parallel to your porch steps, holding tulips in secured vessels at approximately waist height. This vertical installation positions flowers where they’re highly visible and attractive while remaining completely removed from any possible traffic interference. Use brackets specifically rated for outdoor use and substantial weight, securing them into wall studs rather than surface materials alone. The mounted vessel arrangement can’t be kicked, bumped, or displaced regardless of stairway traffic volume or user inattention.
These step solutions respect the reality that vertical circulation paths demand creative placement honoring safety above decoration, and the swing-area techniques ahead address the complications of styling near moving furniture.
Ways to Style Spring Tulips on a Porch Swing Without Tangling Everything
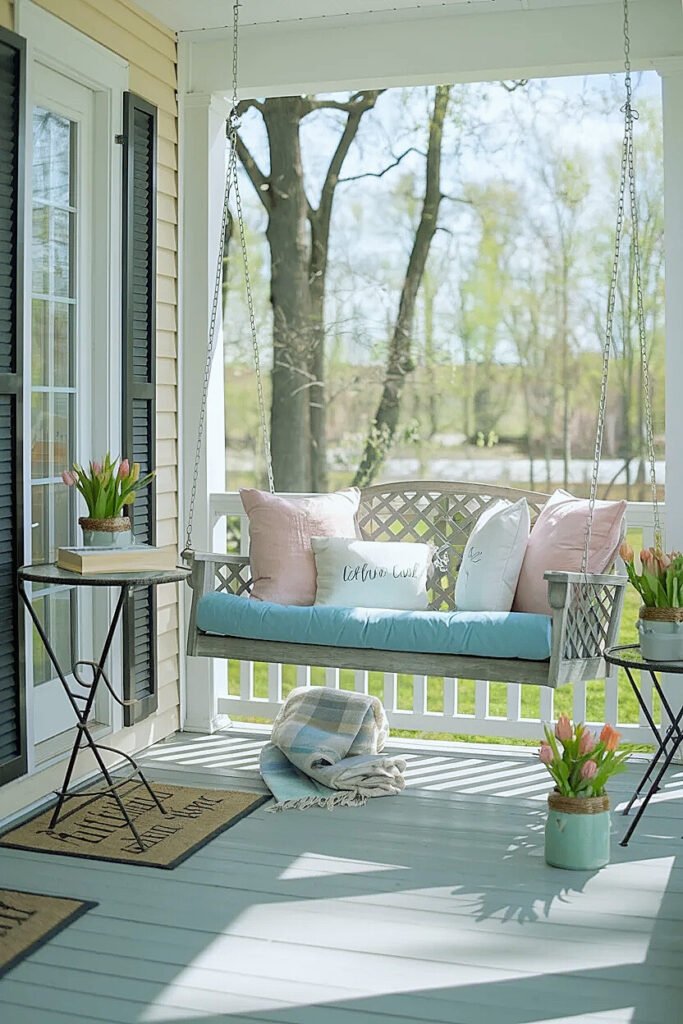
Porch swings move constantly by their very nature, which immediately disqualifies most conventional flower placement approaches that succeed on stationary furniture. Anything attached directly to the swing itself will shift with every motion, creating spills, damage, and tangled messes with chains or decorative elements. I learned this watching a friend’s lovely hanging basket attached to swing chains become a twisted disaster within one afternoon of normal swing use.
The fantasy of flowers adorning the swing directly clashes with mechanical reality, movement creates chaos that even carefully executed arrangements can’t survive. My swing-zone tulip strategies focus exclusively on stable positions near the swing that provide floral context without mechanical complications.
1. Stationary Floor Basket Beyond Swing’s Maximum Arc
Position a generous tulip basket on porch floor at one end of the swing’s travel path, measured carefully to sit beyond the swing’s farthest reach. Track the swing’s complete range of motion by pushing it to maximum extension in both directions, then place your basket minimum ten inches past that farthest point. This creates immediate floral presence that swing users enjoy without collision risk during motion.
2. Independent Ceiling Hook Hanging Basket
Suspend a tulip-filled hanging basket from its own ceiling hook completely separate from swing mounting hardware, maintaining minimum thirty inches separation from nearest swing chain. The independent installation provides vertical interest complementing the swing’s suspended nature without creating entanglement opportunities. The substantial separation ensures even vigorous swinging won’t bring the basket and swing into contact.
3. Wall-Mounted Planter Behind Resting Swing Position
Install a wall-mounted planter box or bracket to the wall behind where the swing naturally rests when not in use, creating floral backdrop that frames the swing without interfering with its motion. The wall installation keeps tulips completely stationary while the swing operates freely in front, and swing occupants enjoy the backdrop beauty.
4. Stable Side Table Arrangement Adjacent to Swing
Place a small occasional table beside the swing, positioned outside its travel path but within comfortable reach, holding tulips in a museum-putty-secured vessel. The table serves dual purposes: tulip display and functional surface for setting drinks or phones. Secure the vessel with putty to prevent sliding if someone bumps the table during entry or exit.
5. Porch Post Ground Planting in Swing Area
Position a large container planting at the base of porch posts near the swing zone, creating substantial grounded floral installation that swing motion absolutely cannot disturb. Use containers minimum eighteen inches in diameter with planted tulip bulbs for permanent seasonal displays requiring zero adjustment relative to swing use.
These swing-area approaches create beauty while respecting movement mechanics, and the porch cart concepts ahead demonstrate tulip integration on mobile serving surfaces.
Ideas for Spring Tulips on an Outdoor Porch Cart Snack Setup
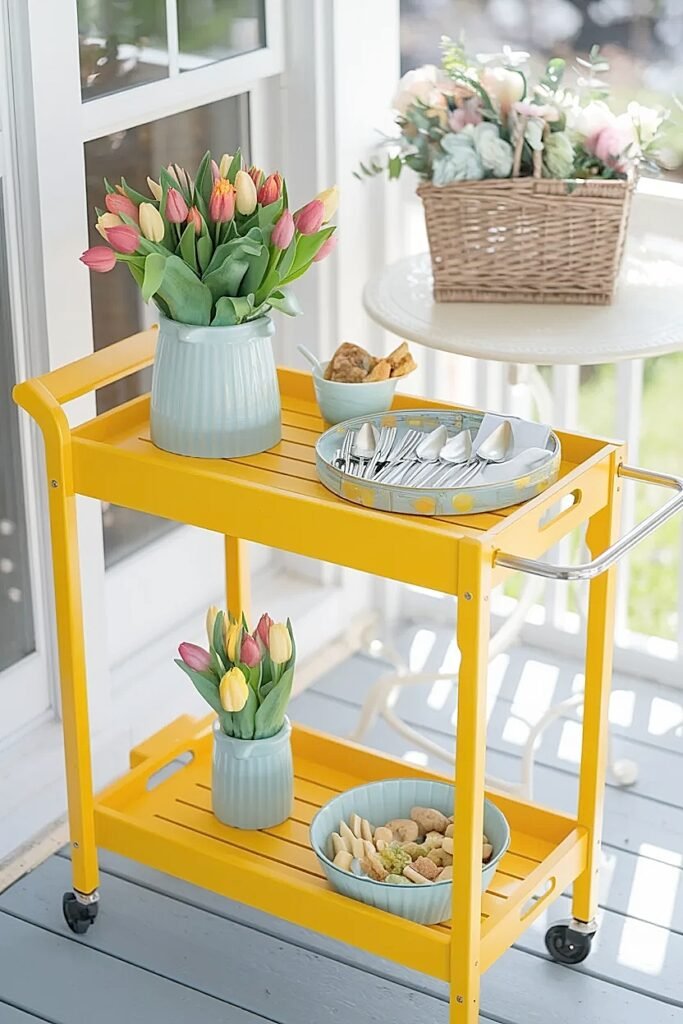
Porch carts combine serving functionality with decorative potential, rolling between storage and active positions while displaying refreshments and flowers simultaneously. The multi-tiered structure offers distinct surfaces for strategic tulip placement that enhances hospitality without compromising the cart’s primary serving purpose. I approach cart styling as creating designated zones where tulips and snacks coexist through deliberate spatial organization rather than random arrangement.
The cart’s mobility demands secure placements that survive transport without shifting or spilling, while the food-service context requires maintaining clear boundaries preventing any flower-to-food contact or contamination.
1. Dedicated Top Tier Floral Display
Claim the cart’s uppermost tier exclusively for tulip arrangements, a generous installation of twenty-five to thirty stems, while reserving all lower tiers strictly for snacks and beverages. This vertical separation creates obvious hierarchy where flowers crown the presentation from premium elevated position while edible elements occupy functional lower tiers. The top tier’s visual prominence makes it ideal for showpiece tulip displays establishing the cart’s overall aesthetic without interfering with food accessibility on working surfaces below. Secure vessels with museum putty to prevent shifting during cart movement.
2. Perimeter Bud Vase Framework with Central Food Focus
Line the cart’s top tier edges with eight to ten small bud vases holding individual tulips, creating floral border that frames a generous central zone reserved for primary snack bowl or platter. Each bud vase holds one perfect bloom, establishing decorative framework without claiming the substantial central real estate needed for featured food presentations. The perimeter arrangement creates cohesion while preserving maximum functional surface. Secure all bud vases with adhesive putty preventing displacement when the cart rolls across uneven porch boards.
3. Bottom Shelf Lush Foundation Installation
Transform the cart’s lowest shelf into abundant tulip installation, a wide, sprawling arrangement creating visual foundation supporting the food-focused tiers above. Bottom shelves typically go unused for food service since bending to access them feels awkward, making them perfect for substantial decorative work. I use low, wide containers spanning sixteen to twenty inches creating impressive floral abundance that grounds the entire cart composition without sacrificing any premium upper-tier real estate needed for accessible snack display.
4. Overhead Suspended Basket from Cart Frame
Attach a hanging basket to the cart’s upper frame or handle structure using heavy-duty S-hooks, creating elevated floral presence claiming zero cart surface area. This approach requires frames sturdy enough to support hanging weight, test thoroughly before loading with tulips. Position hanging elements high enough to clear all items on upper tiers by minimum eight inches, preventing any interference. The overhead installation adds vertical dimension while preserving complete functionality across all cart surface tiers.
5. Asymmetric Corner Installation with Food L-Pattern
Position a compact tulip arrangement occupying one complete corner of the cart’s top tier, with snacks arranged in L-shaped configuration wrapping around it. The corner tulips claim approximately one-quarter of the tier’s surface, perhaps fourteen inches square, while the L-shaped food arrangement efficiently fills remaining space. This integrated approach creates cohesive presentation where flowers and food relate spatially through the L-pattern while maintaining clear separation preventing any contamination concerns. The asymmetric placement feels more dynamic than centered arrangements.
These cart-focused strategies demonstrate that mobile serving pieces can showcase tulip beauty through thoughtful placement respecting both aesthetic ambitions and practical serving demands.
Conclusion
Styling spring tulips across your porch’s various surfaces succeeds when you prioritize function alongside beauty, recognizing that these spaces serve practical purposes that decoration can’t compromise. The placements I’ve detailed emerged from genuine failures, arrangements that blocked doors, got kicked over, or created hazards I hadn’t anticipated. Every porch has unique traffic patterns and usage quirks that only careful observation reveals, so spend time watching how people actually move through and use your space before committing tulips to specific positions. The arrangements that endure do so because they enhance daily porch life rather than complicating it, adding seasonal beauty that survives real-world chaos instead of demanding everyone tiptoe around fragile displays.
This website contains affiliate links, and some products are gifted by the brand to test. As an Amazon Associate, I earn from qualified purchases. Some of the content on this website was researched and created with the assistance of AI technology.