
This website contains affiliate links, and some products are gifted by the brand to test. As an Amazon Associate, I earn from qualified purchases. Some of the content on this website was researched and created with the assistance of AI technology.
Key Takeaways
- Keep garlands low where hands work and higher where eyes travel: below palm height on tables, above head height in doorways, and along the underside of stair rails for clean grip.
- Build in modules: craft 18–24 inch segments with quick ties and water sources so you can install, swap, or repair without dismantling the whole run.
- Edit the palette: one anchor rose tone (crimson or burgundy), one diffuser (blush or cream), and one bridge (dusty rose or mauve) with olive, cedar, or seeded eucalyptus to stitch everything together.
- Hide mechanics, protect surfaces: wrap water tubes in preserved moss, felt-back any clips or hooks, and buffer wood with linen or pewter where garlands rest.
- Light for warmth not glare: frosted LEDs, micro-lights under greens, and side-lit votives; avoid hot flames near petals and varnish.
Styling Valentine rose garlands for tables, doorways, and staircases always starts with movement. People need lanes for plates, hands, coats, and conversation. Roses love company, olive, cedar, and eucalyptus, but they wilt when we trap them under heat or stretch them with poor support. I treat a garland like film editing: the eye follows a rhythm of blooms and breath, color and quiet, glow and shadow.
I learned this on a winter dinner where I draped a lush runner that looked perfect at 5 p.m. and tired by dessert. Since then, I design in modular sections, tuck water at the nodes, and keep profiles low where life happens. The result isn’t floral noise; it’s a guided path of light and petals that makes rooms feel generous and intentional.
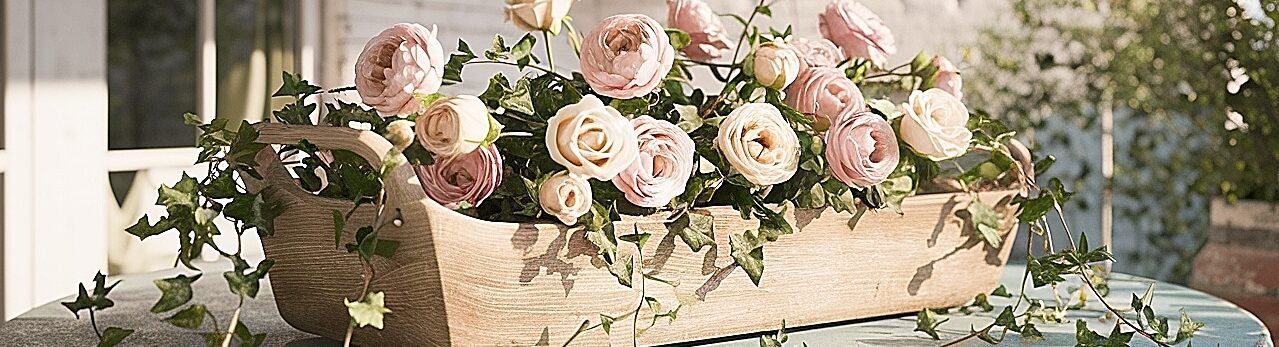
How to Drape a Valentine Rose Garland Down a Rustic Dining Table

A long table eats centerpieces and rewards restraint. I build the garland in 20-inch modules on the counter first: a base of olive sprigs laid in one direction, a counter-direction layer of cedar for plushness, and stitched points of seeded eucalyptus to add peppered texture. Into that, I nest rose clusters, two anchor blooms and one diffuser per cluster, with short stems in micro water tubes wrapped in moss. I keep the profile under five inches so conversation stays effortless over the top.
On the table, I lay a narrow linen runner as a buffer, then place the modules end-to-end with a subtle overlap so the seams vanish. I feather the greenery over the junctions and stagger clusters every 10–12 inches to create a heartbeat down the line. Frosted votives sit off the garland’s shoulders, never inside the greens, to keep heat away from petals and silverware. If platters are coming, I leave obvious breaks, negative space “ports”, so dishes land without negotiation.
Pre-build low, moss-wrapped modules with olive, cedar, and seeded eucalyptus, then connect them over a linen buffer, staggering rose clusters and lighting from the sides for a breathable, service-friendly centerpiece; for centerpieces that pair naturally with these garlands, see Ways to Style Rustic Valentine Rose Centerpieces for Dining Tables, and if this helps, share this post with friends on social media. There’s more ahead, doorways next.
What Are the Best Valentine Rose Garland Ideas for Doorways?

- Soft Arch with Hidden Command Hooks
I map the arch with clear, damage-free hooks inside the molding line. A lightweight base of olive connects with discreet jute ties; rose clusters sit at the top-third and side-third points, leaving the bottom cleaner for coat traffic. I hide micro battery packs behind the vertical legs and run warm micro-lights under greens for a halo without visible wires. The scale feels generous but never brushes shoulders. - Split-Swag “Curtain Tie” Treatment
Instead of a full arch, I swag two short garlands from each side of the doorway, fastening at shoulder height with felt-backed ties. Roses concentrate at the tie points, two anchors and one diffuser, so the color reads as portals, not a barrier. This works for narrow halls and keeps the header free for taller guests, while still delivering a Valentine moment in motion. - Overdoor Shelf Ledge Garland
If there’s a shallow ledge or transom frame, I set a low, linear garland on top with roses angled forward in tubes. Olive and cedar mask the ledge; seeded eucalyptus adds silhouette. A strip of museum gel prevents slippage, and the height keeps petals safe from bag straps. Light trick: two frosted LEDs on neighboring walls to cross-illuminate without glare.
Hint: choose a mount style that respects headroom, hooked arch, side swags, or ledge runs, then cluster roses at visual focus points and keep mechanics felt-backed and invisible. Keep reading for console and sideboard strategies that blend beauty with service.
How to Style Rose Garlands Along Console Tables and Sideboards for Valentine Dinners

Console and sideboard surfaces are staging zones. I treat the garland as a frame, not a blockade. I run a low greenery line along the back third of the surface so serving platters sit in front. Clusters appear as visual commas every foot, with the richest color near lamplight. Water sources hide in small ceramic cups behind the greens; short-stemmed rose heads sit in tubes and lean into the light for a cinematic sheen.
Depth matters. On narrow consoles, I swap bulky cedar for flat eucalyptus and olive to stay sleek. Lamps get linen shades or dimmers, petals look expensive under soft light. Any candle action lives in frosted sleeves at the ends, far from petals. When guests arrive, I can lift a 24-inch segment and slide it aside for a punch bowl without unraveling the story.
Push a low garland to the back third, stage roses in hydrated clusters angled toward lamps, and protect service lanes in front; modular segments let you expand or retract on the fly. Staircases are next, the most photographed runway in the house.
Ideas for Wrapping Valentine Rose Garlands Around Staircase Railings

- Under-Rail Wrap with Clear Zip Ties
I attach the greenery base under the handrail with clear micro zip ties every 8–10 inches, snipping tails and covering joins with moss. Rose clusters perch on the outer curve, secured with paper-wrapped wire. This preserves the top of the rail for grip and keeps petals safe from hands and sleeves. - Newel Post Focus with Trailing Tails
I concentrate roses and cedar volume at the newel post, then taper a lighter olive trail up the first five balusters. Two anchor blooms and two diffusers hold the post visually; the fade keeps traffic clean. A felt-backed pewter plate under the post collar protects wood from moisture. - Baluster-to-Baluster Swag
On open staircases, I swag the garland between every third baluster with soft J-curves. Roses sit at the lowest points of each swag to create rhythm. I hide micro-lights along the upper rope of greenery for indirect glow that doesn’t stare into eyes on ascent. - Mixed-Texture Wrap (Olive + Cedar + Grapevine)
I braid a thin grapevine into olive and cedar for structure without bulk. Grapevine takes wire beautifully and gives roses firm purchase. The natural twist reads authentically rustic and holds up through door drafts. - Safety-First Split Design
If small kids or guests need full rail access, I style only the spindles and newel sides, leaving the rail top and inner edge clean. Short-stemmed rose heads sit tight to the greens in tubes to minimize snag risk. The visual reads full from the room but stays functional up close.
Hint: fasten under the rail, build drama at the newel, and stage roses at rhythm points; keep handholds clean, joins moss-wrapped, and lighting indirect for a safe, elegant ascent. Chairs are quiet heroes, let’s dress them lightly.
Ways to Use Valentine Rose Garlands as Chair-Back Accents Around Tables

- Mini Garland Loop with Ribbon Anchor
I craft 12-inch micro-garlands from olive and eucalyptus, wire in one anchor rose and one diffuser, then tie to the top rail with a velvet ribbon that matches the bridge tone. The loop sits flat, so coats don’t snag, and the color echoes the centerpiece without crowding the seat. - Side-Drape Accent for Host Chairs
On host chairs, I attach a short garland to the outer back stiles and let it drape four inches along one side only. Two small rose heads point downward, which photographs beautifully from the room’s entry. I add a felt pad between greenery and wood to avoid abrasion. - Tag-Style Plaque Garland
For place cards, I hang a skinny garland strip like a tag from the center slat, fixing a small kraft or bone tag with names below a single rose head. It’s light, personal, and won’t interfere with chair movement. The trick is weight: keep the stems short and tubes tiny.
Keep chair garlands tiny, flat, and protective, felt buffers, short stems, and single-bloom accents, so seating stays comfortable and the room reads cohesive. Buffets demand clarity; garlands need to guide, not gobble space.
Ways to Outline Buffet Tables with Low Valentine Rose Garlands

Buffets succeed when the path is obvious. I outline only the back edge and the outer corners with a low greenery line, then stage rose clusters at decision points: start, protein, dessert. The message is directional, not decorative clutter. Low height, under three inches, keeps labels visible and wrists clear.
For protection, I set the garland on a narrow linen strip or a line of pewter saucers, each holding a micro cluster in a tube. If a hot dish arrives, I lift a saucer, shift four inches, and reset in seconds. Lighting is practical: frosted LEDs at the ends and nothing that flickers near napkins. The palette echoes the dining table so the whole space sings a single note.
Hint: run a low perimeter garland along the back edge, punctuate with rose clusters at key stations, and mount on saucers or a linen strip for fast shifts without mess. Open shelving and hutches love vertical punctuation, here’s how to keep it airy.
Ways to Combine Valentine Rose Garlands with Open Shelving and Hutches

- Shelf-Edge Ribboned Garland
I lay a pencil-thin olive rope along the front edge of the middle shelf, secured with discreet museum wax. A narrow velvet ribbon in the bridge tone weaves through, and single rose heads in tubes sit every 12 inches, angled slightly down. The color reads from across the room without blocking bowls or books. - Corner Cluster Ladders
Rather than spanning full shelves, I build three short vertical clusters that climb one hutch corner: greens first, then small rose groups in ascending order. It frames the cabinet like a camera vignette and keeps the shelves usable. Battery packs hide behind the face frame. - Negative-Space Niches
On open shelves, I leave entire sections empty except for a low garland coil and one rose head on a pewter coaster. The breath between objects feels intentional and gives the eye a rest. It’s the most editorial tactic and the fastest to clear when you need that shelf back.
Keep garlands pencil-thin on shelves, cluster vertically at corners for drama, and use negative space to avoid visual congestion; hide attachments with wax, felt, or ribbon guards to protect finishes.
Practical Build Notes and Pro Tips
- Conditioning roses: give stems a fresh diagonal cut, strip leaves below the waterline, and hydrate for at least 30 minutes before building. For head inserts, harvest after conditioning when petals feel springy.
- Water on the run: use micro tubes wrapped in preserved moss; alternate real blooms with high-quality silk in heat-prone spots (above radiators, sunny doorways).
- Fasteners: choose clear micro zip ties, paper-wrapped wire, jute ties for rustic texture, and felt-backed clips on wood. Always test a hidden patch before committing.
- Lighting: warm white 2200–2700K reads candlelike; tuck strands beneath greens, not on top. Hide packs in lanterns, behind balusters, or inside console lampshades.
- Palette discipline: repeat the same anchor/diffuser/bridge across the house so garlands, centerpieces, and side stations feel like one idea.
Common Mistakes to Avoid
- Overstuffing: a bulky garland looks heroic at noon and exhausted by dessert; leave negative space and keep stems short.
- Scent overload: avoid heavy fragrance in tight spaces, roses plus cedar are enough near food.
- Unprotected finishes: always buffer wood with linen, felt, or pewter; condensation and micro-abrasions are sneaky.
- Hot candles near petals: use frosted LED where greens live; real flame belongs far from blooms.
Hint: condition blooms, hydrate the nodes, use gentle fasteners and warm light, and repeat a tight palette; avoid bulk, scent overload, heat, and bare mechanics for garlands that last and behave. There’s more below, stick with me for a clean wrap-up you can screenshot before shopping.
Conclusion
Great Valentine rose garlands don’t shout; they guide. Build them in low, liftable modules that respect how people move through rooms. On tables, keep profiles under five inches, cluster roses every foot, and light from the sides. In doorways, mount cleanly with felt-backed or removable hardware and focus blooms at thirds so the frame feels intentional without brushing shoulders. On staircases, secure under the rail, dramatize the newel, and protect grip zones.
Chair accents stay tiny and flat; buffets get a disciplined back-edge line punctuated at decision points. Shelving wants pencil-thin edges, corner ladders, and negative space. Hide water in moss-wrapped tubes, kill glare with matte textures, and repeat a tight palette, anchor, diffuser, bridge, stitched with olive, cedar, and seeded eucalyptus. Edit once before guests arrive, then let the garlands carry a warm, quiet story through every room.
This website contains affiliate links, and some products are gifted by the brand to test. As an Amazon Associate, I earn from qualified purchases. Some of the content on this website was researched and created with the assistance of AI technology.